
Two ways to connect
Connect from Claude
Add the server as a custom connector in Claude on the web. It follows your account to the desktop and mobile apps.
Connect from Claude Code
One command in the terminal, then sign in. For developers and for a project-wide setup shared with a team.
What you can ask for
Once connected, you can say things like:- “Make a 60-second explainer about our new expense-tracking feature, professional tone, for YouTube.”
- “Create a vertical Instagram teaser for our coffee brand: warm, cozy, upbeat music.”
- “Turn this blog post into a video: https://example.com/post”
- “Show me a preview first.” Claude builds the storyboard and gives you a preview link before anything is rendered.
- “Make the title smaller and swap the clip on scene 2.” After a preview, edits are applied in place; the same preview link shows the change.
- “Which voices do you have?”, “How much quota do I have left?”
Who designs the scenes
This is the first question Claude asks, and the most consequential. It decides what you supply, how much control you keep, and which tools come into play. There is no default, so Claude always asks; the choice applies to the whole video, not to individual scenes.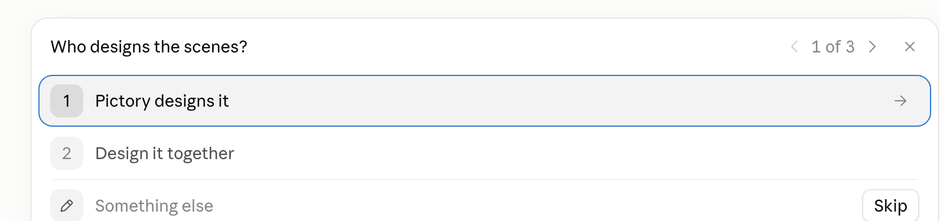
The design mode question, asked first because it has no default.
Pictory designs it
Pictory’s AI Storyboard lays out every scene: the visuals, the on-screen text, the colors and the pacing. You supply the source material only, as any one of:- A brief. A plain-language prompt for a video Pictory writes the script for. Claude asks what the video is about, what it is for (an explainer, marketing, internal communication, a tutorial or a product video), how long it should run (8–500 seconds) and how it should sound. It asks where the video will be published too, because that settles the shape.
- A script you already have. The storyboard splits it into scenes and designs each one around your words.
- A blog or article URL. Pictory reads the page and turns it into a video.
- Scene-by-scene narration. You give the narration for each scene, with an optional background per scene.
Design it together
You and Claude compose each scene explicitly, then send the finished design. Per scene you control:- Narration. It becomes both the voice-over and the burned-in subtitles. A title or call-to-action card may omit it, but then needs a minimum duration. A scene carried by an AI-generated clip may omit it too, and lasts as long as the clip (see AI-generated media).
- Background. Exactly one of a stock clip or image (from a search, or your own URL), a solid color, or an AI-generated visual. Plus an optional color tint, a slow pan on stills, and loop or mute on footage. A stock clip loops by default, so a short clip still covers the narration over it.
- Elements, up to 20 per scene, drawn in order:
- Text overlays with control over font, size, color, case, alignment, wrap width, placement and entry or exit animation. Every text element enters with an animation unless you ask for none: a heading drifts up, other text fades in.
- Shape overlays from a library of badges, arrows, quote marks, underlines, blobs and speech bubbles, plus plain rectangles, circles and lines that can be drawn to any width and height. A rectangle with both is a bar, a panel or a divider, which is how bar charts, stat rings and stat tiles are built. A filled shape placed before a text element gives the text its own panel.
- Extra image or video panels, from a search or your own URL. AI-generated media always goes on the scene background, never on an element.
- Placement. An anchor preset (nine positions relative to the scene, kept clear of the edges) or an exact top and left offset in percent.
- Scene transition, minimum duration, and the option to hide subtitles where your own text elements already carry the words.
- Music, as one track for the whole video or a mix chosen scene by scene (see Music).
AI-generated media
In Design it together, Claude asks whether the scenes use stock media, which is free, or AI-generated media, which draws AI Credits. For AI-generated media it then asks, one question at a time:- Images, videos, or let AI decide. With let AI decide, Claude uses a video for a scene with motion, sound or dialogue and an image for a still idea, and tells you which scenes get which.
- Sound. For videos: whether the clips make their own sound, such as ambience or speech.
- The model. Claude lists the models that fit your answers and the video’s shape, cheapest first, with what one clip or image costs. With let AI decide it asks for a video model and then an image model. Veo and Omni Flash make no 1:1 video, so the shape is settled first.
- Continuity and a consistent subject. With two or more AI scenes: whether the scenes should flow into each other as one continuous shot, and whether a person or product must look the same in every scene. If you share a link to an image of it, Claude uses it as a reference: on every AI scene without continuity, and on the first scene of each continuous run, whose last frame then carries the look into the scenes after it.
Which to choose
You can ask for a preview in either mode, and in Design it together you can keep editing that
preview until it is right before anything is rendered.
Music
If you want music, Claude asks how it should be chosen. When you design the scenes together:- One track for the whole video. Pictory picks a track that suits the video, or Claude finds one in Pictory’s music library once the story is final and offers it to you.
- A mix chosen scene by scene. Once the scene list is agreed, Claude groups neighboring scenes that share a mood, such as the opening, the problem and the close, searches the music library separately for each group, and offers a different track for each. A track plays on across its group without restarting. If some scenes are left without a track, Claude asks whether they play one track underneath or have no music. Every track in a mix is chosen from the library; there is no automatic pick for a scene.