> ## Documentation Index
> Fetch the complete documentation index at: https://docs.pictory.ai/llms.txt
> Use this file to discover all available pages before exploring further.
# Text to Video with Zapier and Google Sheets
> Automate video creation from Google Sheets using Pictory API and Zapier. A two-zap approach that keeps each zap lightweight and ensures reliable execution.
This guide demonstrates how to build a no-code video creation pipeline using [Zapier](https://zapier.com) and Google Sheets. The integration uses two separate Zaps to render videos from spreadsheet data and receive completion notifications via webhook.
## Why Two Zaps?
Zapier tasks have execution time limits that vary by plan. Since video rendering can take several minutes, a single Zap that submits a render request and waits for completion could exceed these limits or consume unnecessary task credits.
By splitting the workflow into two Zaps, each Zap completes quickly:
1. **Zap 1** submits the render request and writes the job ID to the spreadsheet (completes in seconds)
2. **Zap 2** receives a webhook callback when rendering finishes and updates the spreadsheet with the video URL (completes in seconds)
This two-zap design ensures reliable execution regardless of how long the video takes to render, and minimizes the number of Zapier task executions consumed.
## Architecture Overview
```mermaid theme={null}
flowchart LR
subgraph Zap1["Zap 1: Render Video"]
A[Watch New Rows] --> B[Search Approved Rows]
B --> C[Loop Through Rows]
C --> D[Pictory Render API]
D --> E[Write Job ID]
end
subgraph Pictory["Pictory Cloud"]
F[Video Rendering Engine]
end
subgraph Zap2["Zap 2: Webhook"]
G[Webhook Trigger] --> H[Search Job Row]
H --> I[Update Video URL & Status]
end
D -->|render request + webhook URL| F
F -->|webhook callback| G
```
## Before You Begin
Ensure you have the following:
* A Pictory API key ([get one here](https://app.pictory.ai/api-access))
* A [Zapier](https://zapier.com) account (free or paid)
* A Google account with access to Google Sheets
* A Google Sheets spreadsheet set up with the required structure (described below)
## Google Sheets Setup
Create a Google Sheets spreadsheet with two sheets: **Videos** and **Video Trigger**.
### Sheet 1: "Videos"
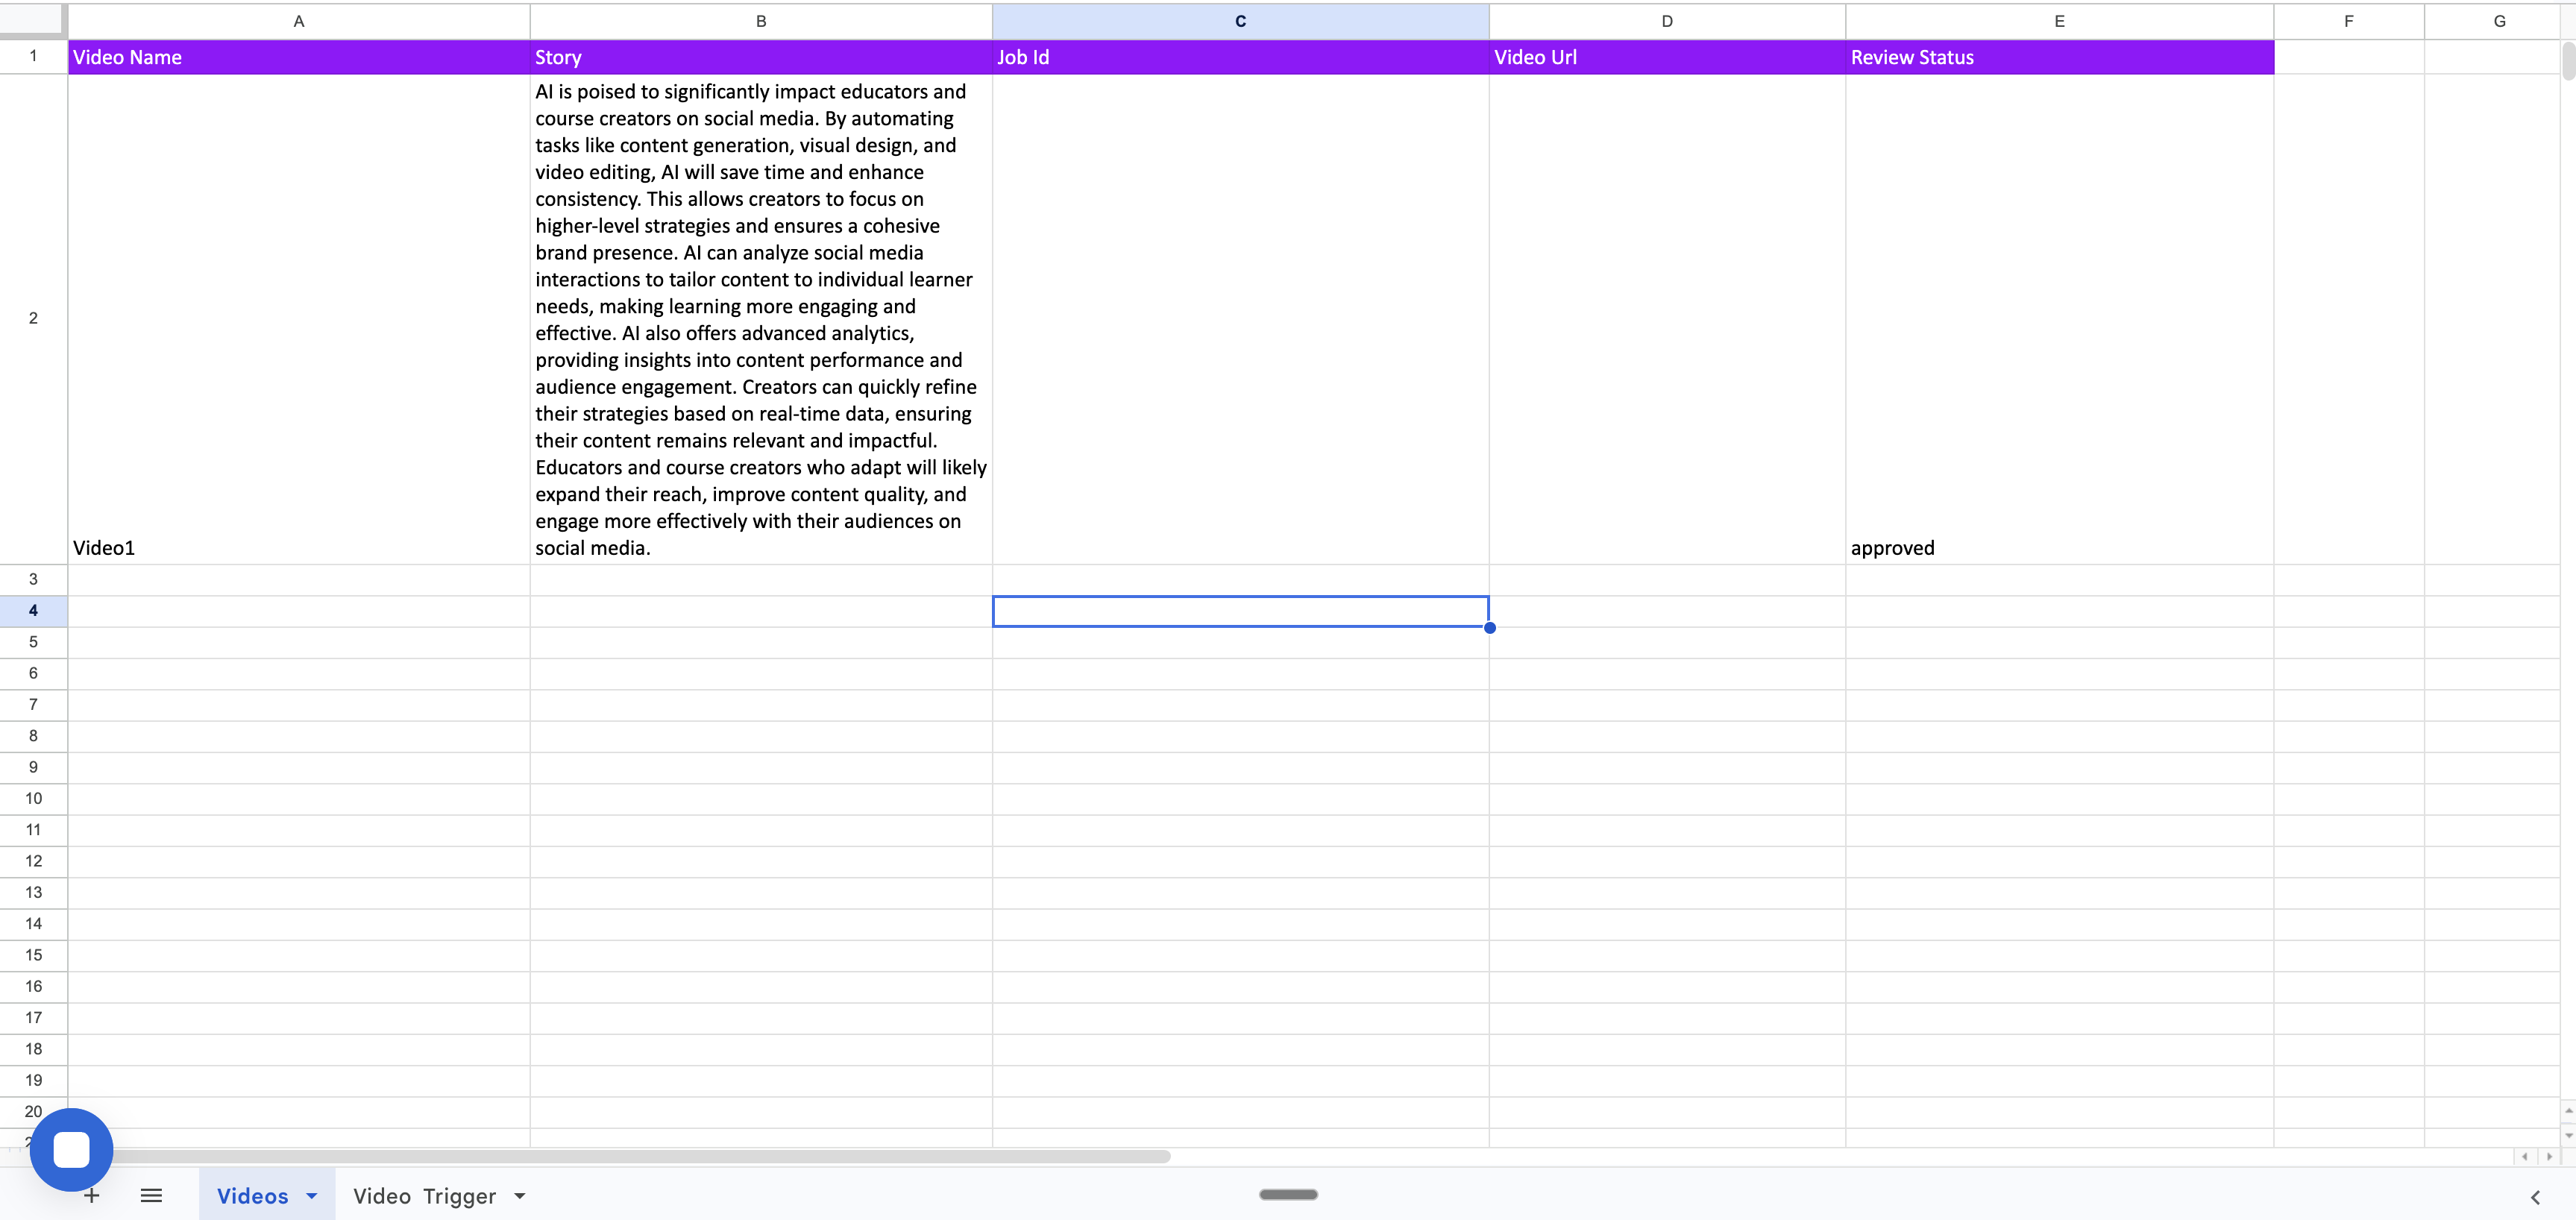
This is the primary data sheet that stores video entries and their rendering results. Set up the following column headers in row 1:
| Column A | Column B | Column C | Column D | Column E |
| -------------- | --------- | ---------- | ------------- | ----------------- |
| **Video Name** | **Story** | **Job Id** | **Video Url** | **Review Status** |
For each video entry, populate the following columns:
* **Video Name**: A descriptive name for the video
* **Story**: The full story text that Pictory will convert into video scenes
* **Review Status**: Set to `approved` when the row is ready for rendering
Leave the **Job Id** and **Video Url** columns empty — these are populated automatically by the Zaps during execution.
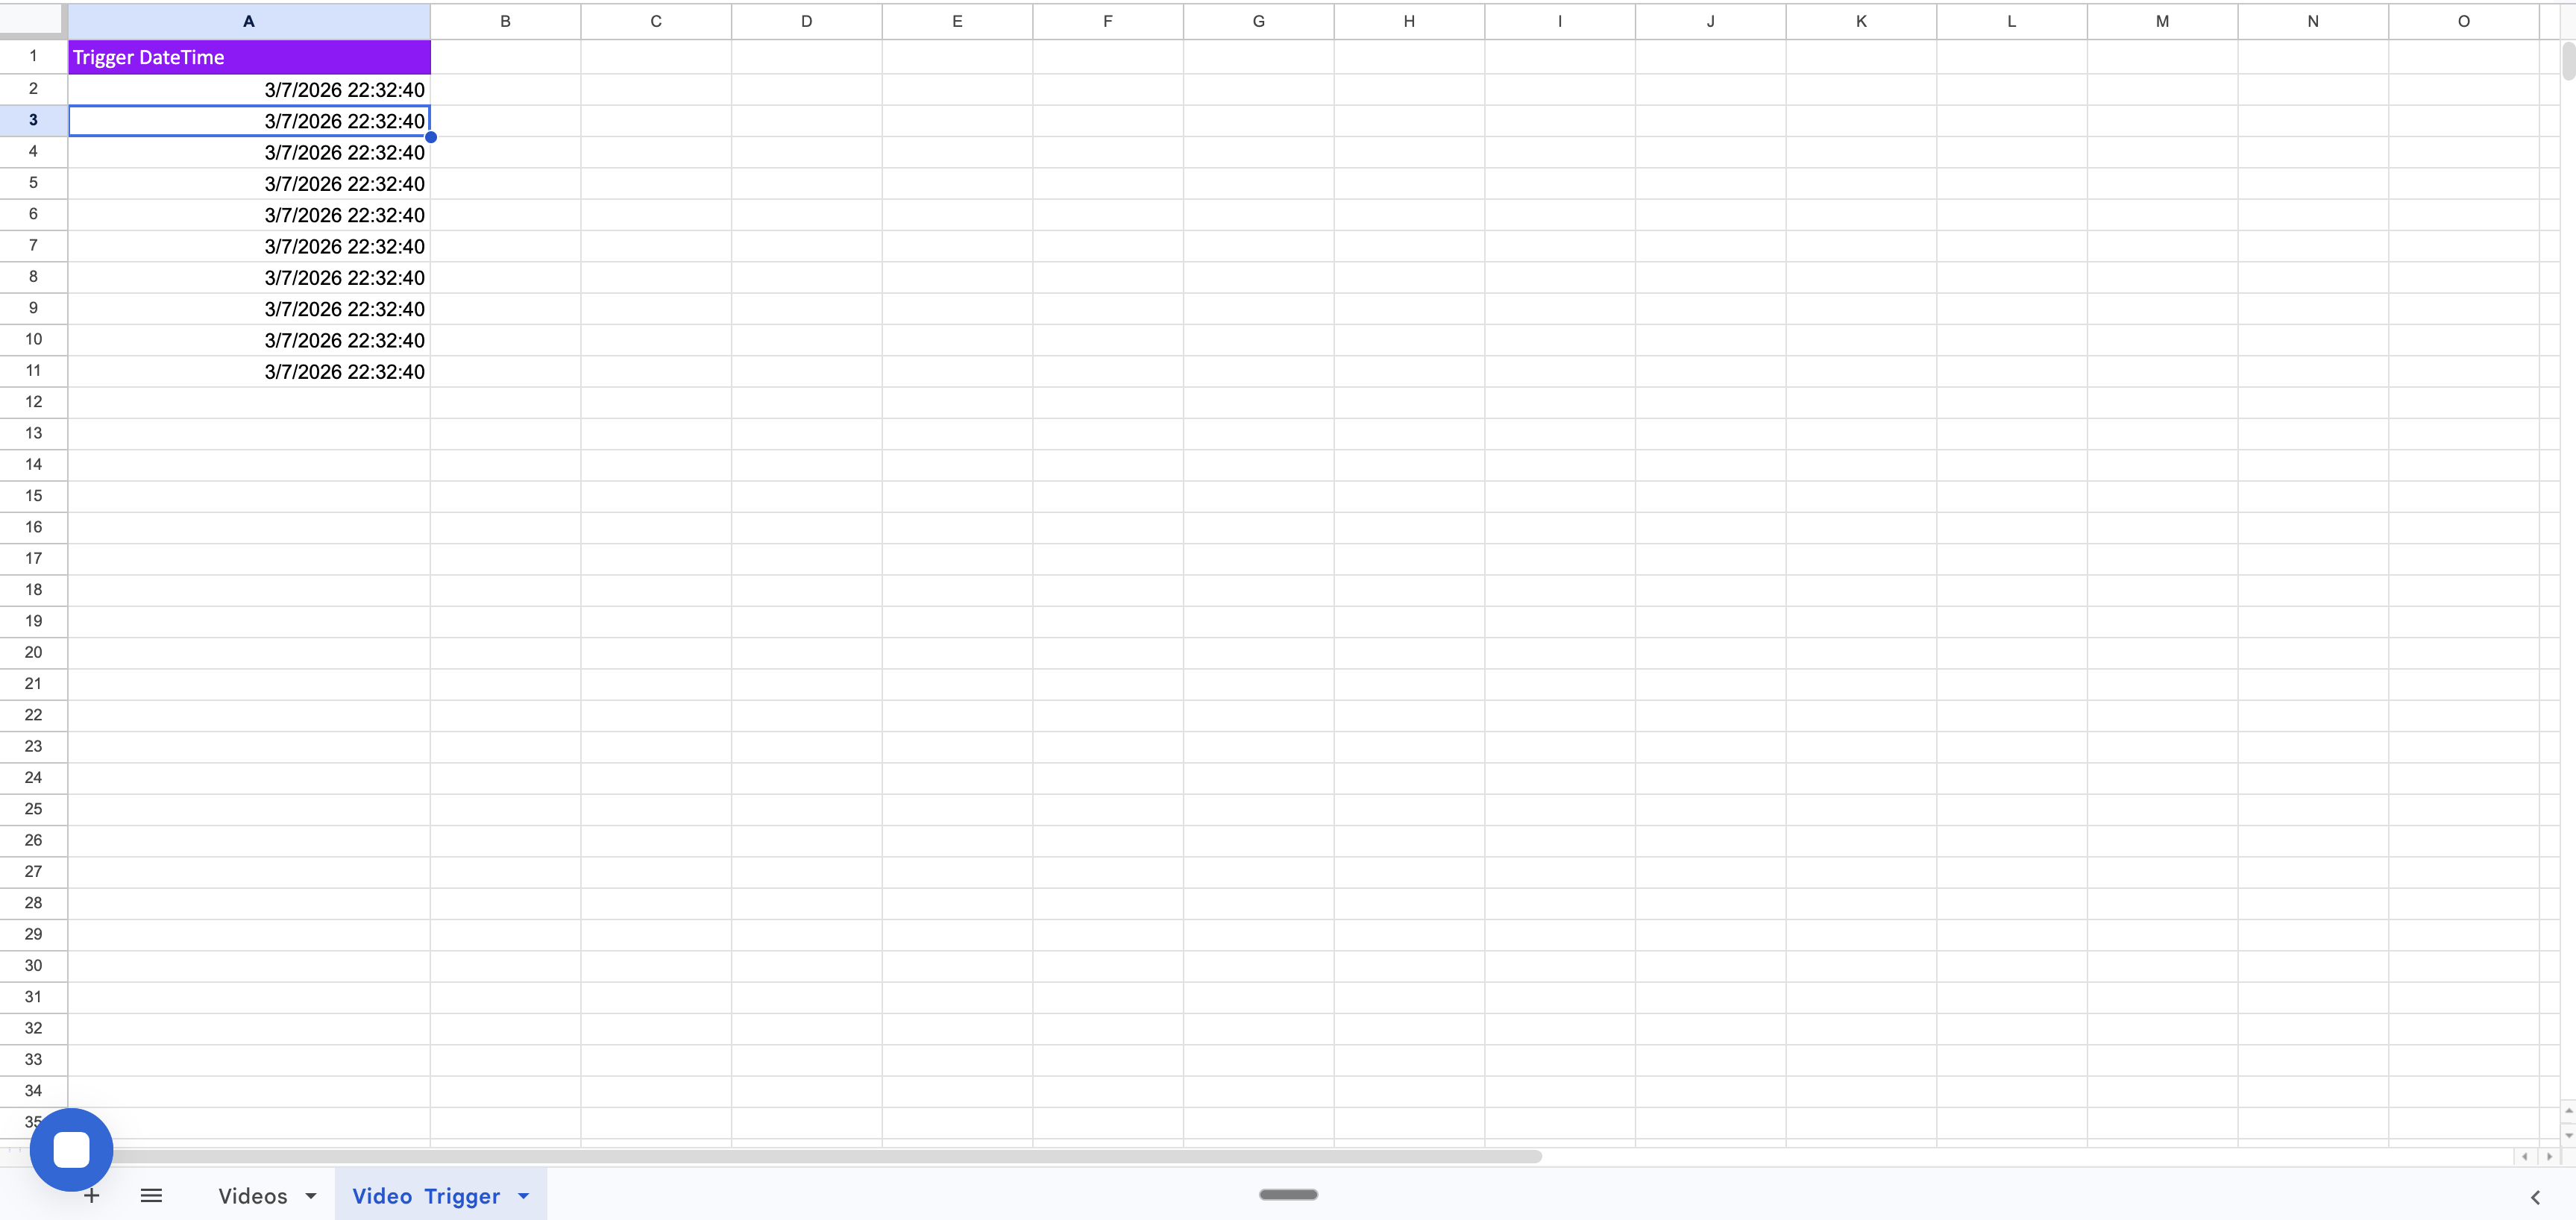
 ### Sheet 2: "Video Trigger"
This sheet controls when Zap 1 runs. It contains a single column:
| Column A |
| -------------------- |
| **Trigger DateTime** |
Each time you add a new datetime value to this sheet, Zap 1 detects the new row and initiates a rendering cycle. Add the current date and time to trigger a new execution.
### Sheet 2: "Video Trigger"
This sheet controls when Zap 1 runs. It contains a single column:
| Column A |
| -------------------- |
| **Trigger DateTime** |
Each time you add a new datetime value to this sheet, Zap 1 detects the new row and initiates a rendering cycle. Add the current date and time to trigger a new execution.
 ## Spreadsheet Data Flow
As the two Zaps execute, the Videos sheet progresses through the following states:
### State 1: Ready for Rendering
The row contains the video name, story text, and review status set to `approved`. The Job Id and Video Url columns are empty.
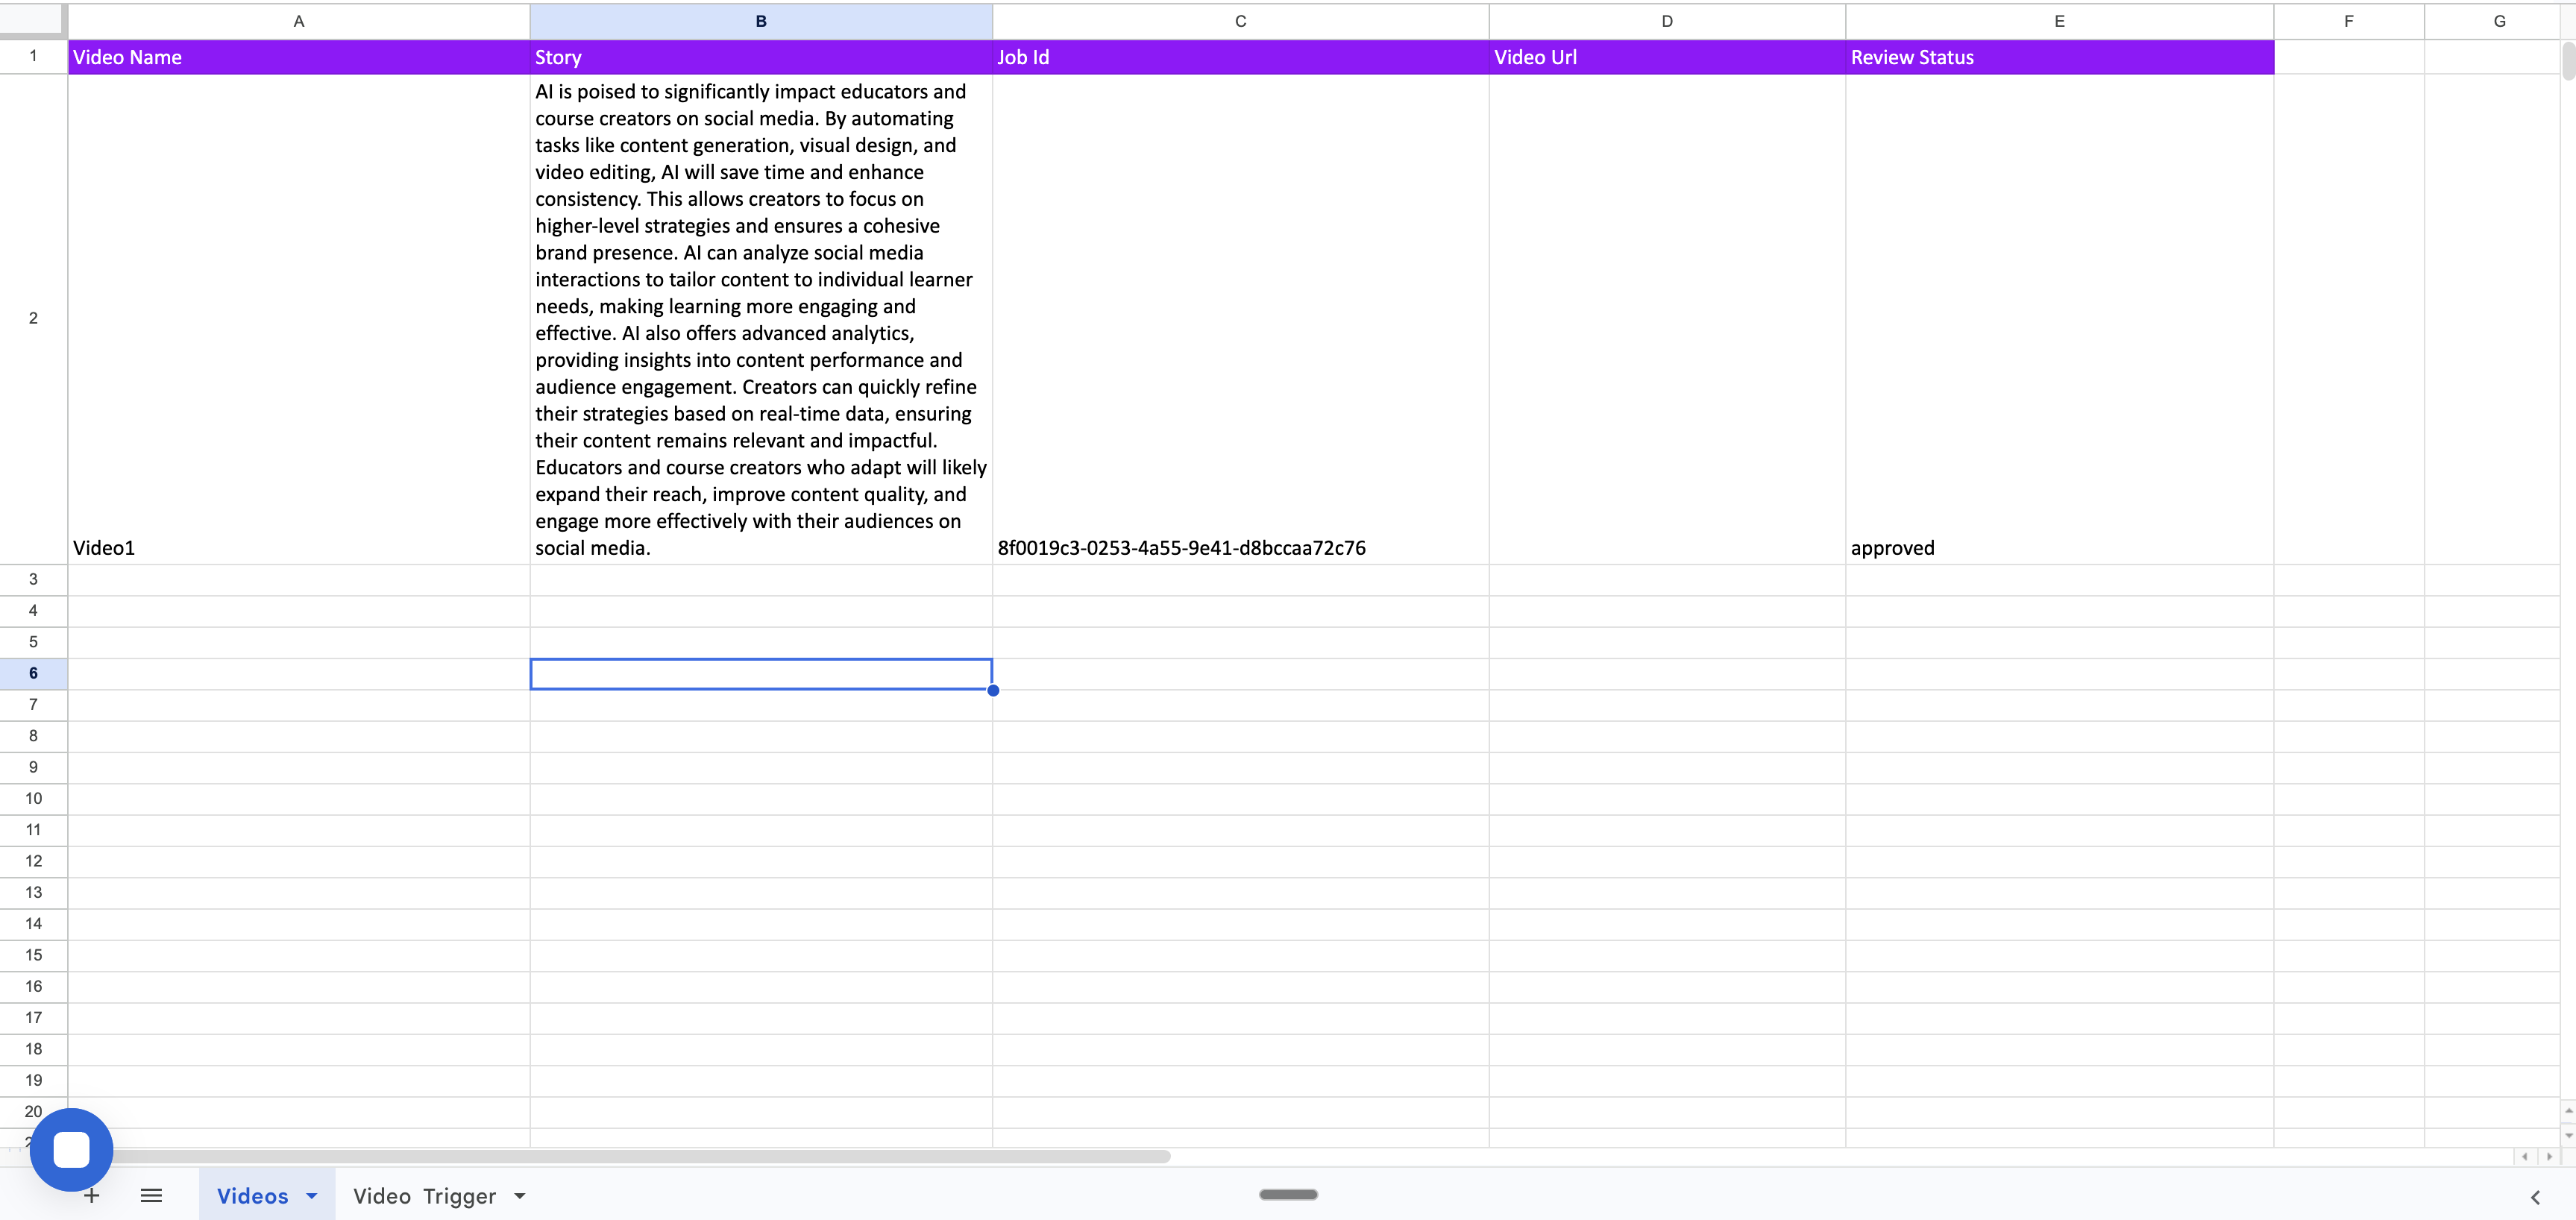
### State 2: Render Submitted (After Zap 1)
After Zap 1 executes, it submits the render request to Pictory and writes the returned `jobId` into the **Job Id** column. The review status remains `approved` while the video is being rendered in the Pictory cloud.
## Spreadsheet Data Flow
As the two Zaps execute, the Videos sheet progresses through the following states:
### State 1: Ready for Rendering
The row contains the video name, story text, and review status set to `approved`. The Job Id and Video Url columns are empty.
### State 2: Render Submitted (After Zap 1)
After Zap 1 executes, it submits the render request to Pictory and writes the returned `jobId` into the **Job Id** column. The review status remains `approved` while the video is being rendered in the Pictory cloud.
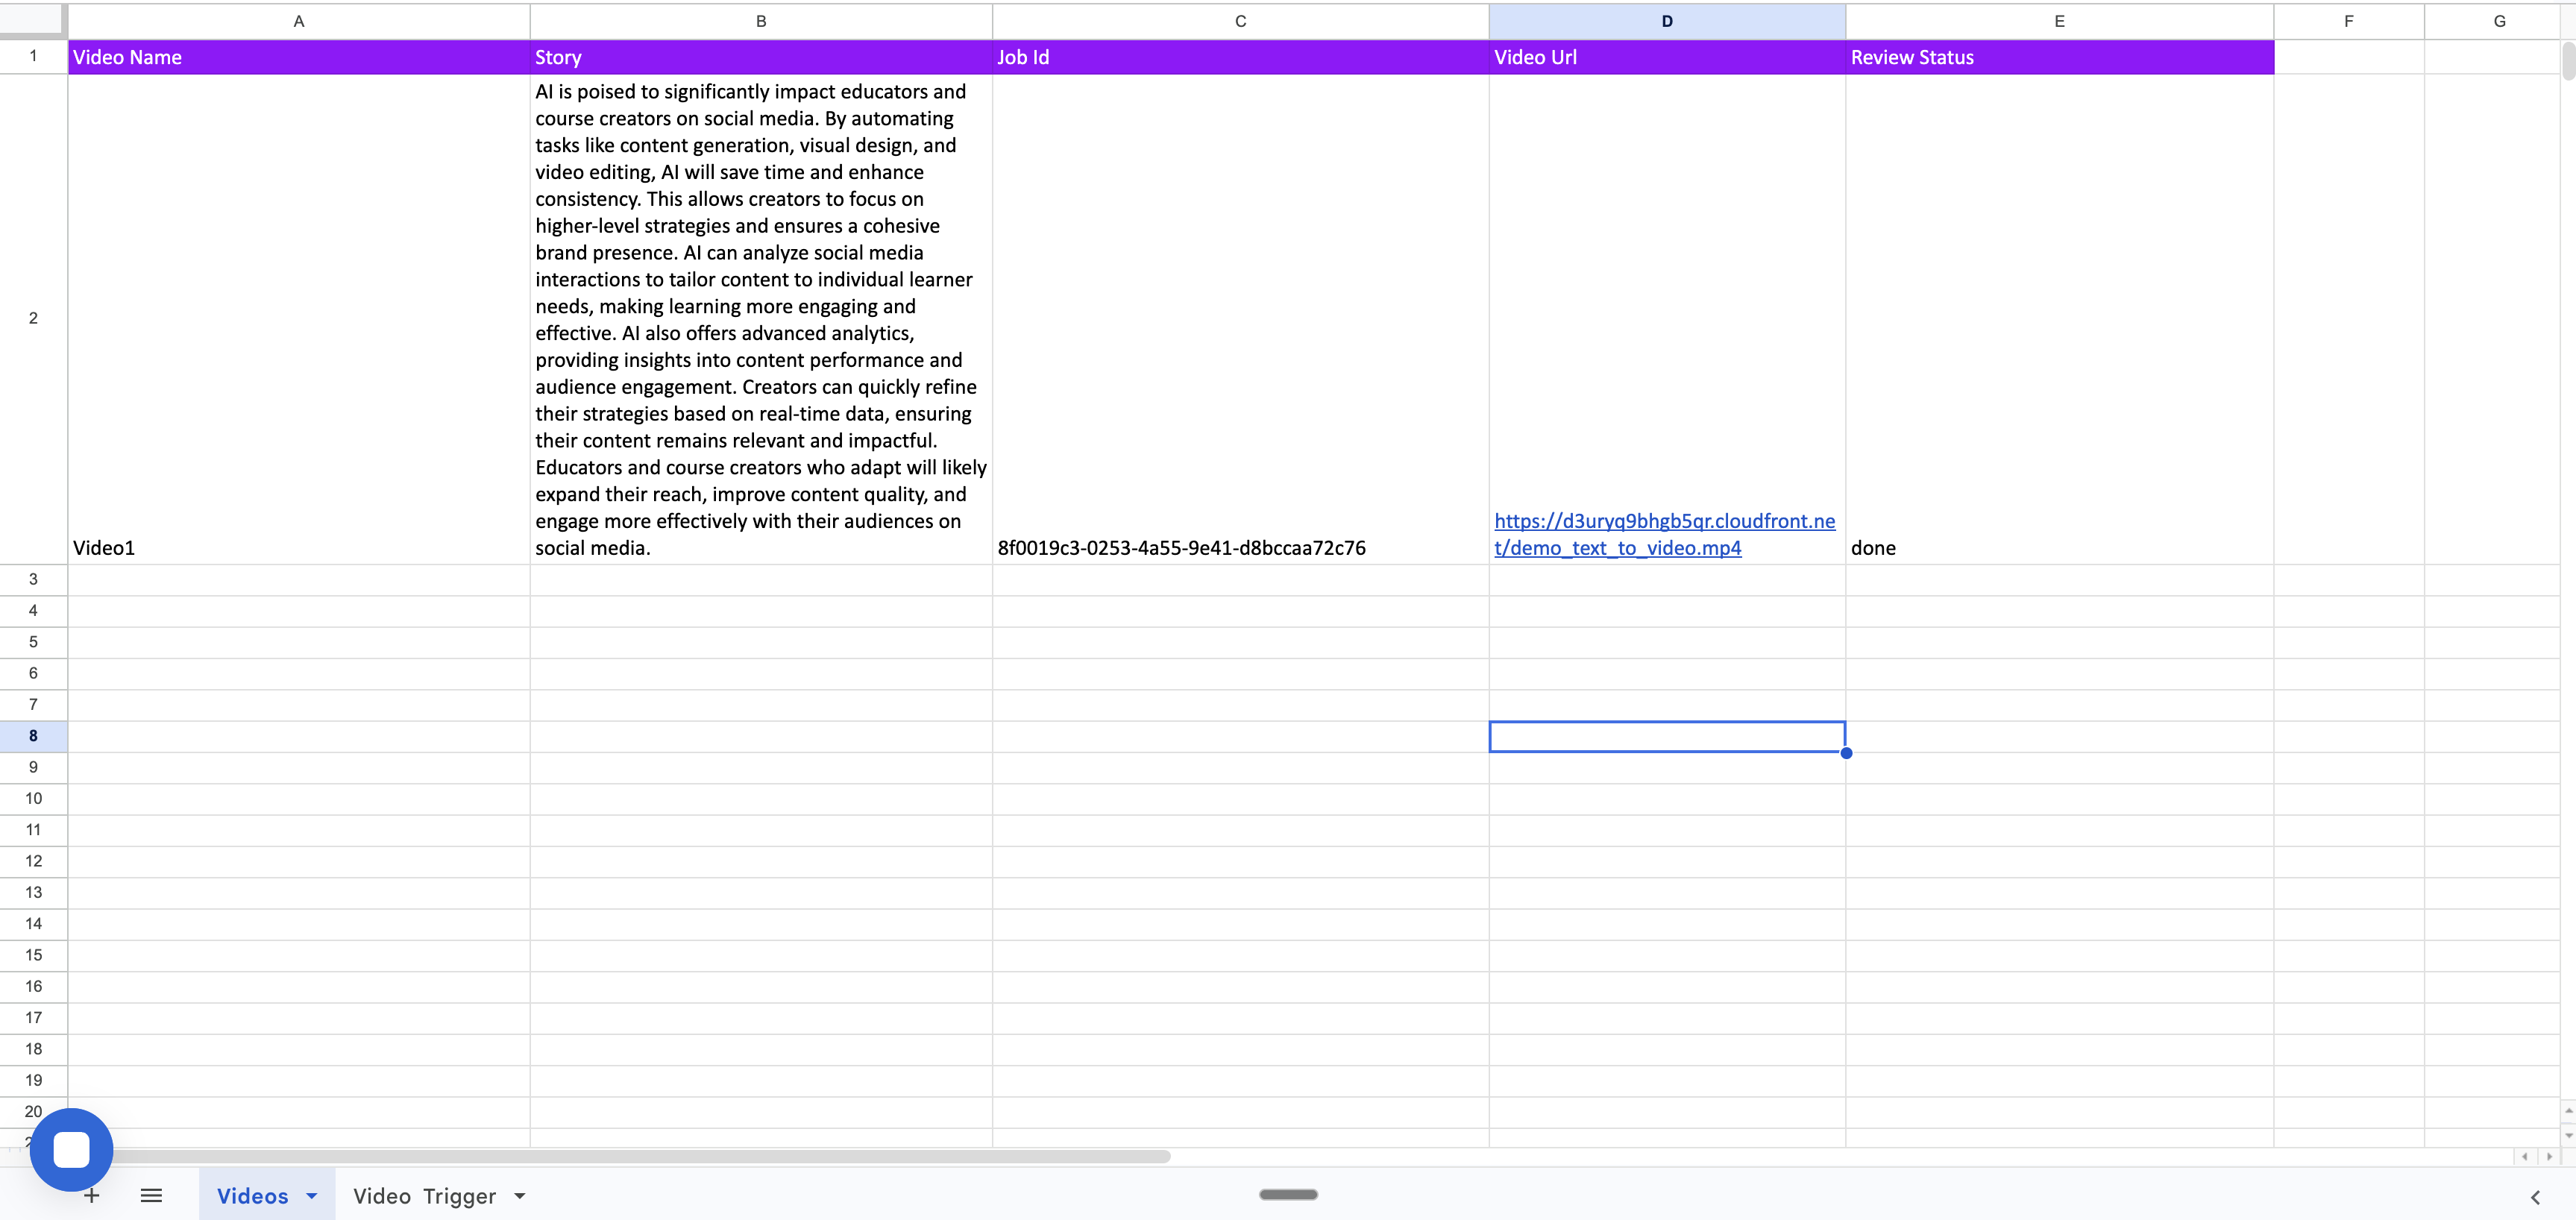
 ### State 3: Rendering Complete (After Zap 2)
When Pictory finishes rendering the video, it sends a webhook callback to Zap 2. The Zap locates the row by matching the job ID, writes the rendered **Video Url**, and updates the **Review Status** from `approved` to `done`.
### State 3: Rendering Complete (After Zap 2)
When Pictory finishes rendering the video, it sends a webhook callback to Zap 2. The Zap locates the row by matching the job ID, writes the rendered **Video Url**, and updates the **Review Status** from `approved` to `done`.
 ## Zap 1: Render Text to Video from Google Spreadsheet
This Zap watches for new rows in the trigger sheet, finds approved video entries, loops through each one, submits them to the Pictory Render API, and writes the job ID back to the spreadsheet.
## Zap 1: Render Text to Video from Google Spreadsheet
This Zap watches for new rows in the trigger sheet, finds approved video entries, loops through each one, submits them to the Pictory Render API, and writes the job ID back to the spreadsheet.
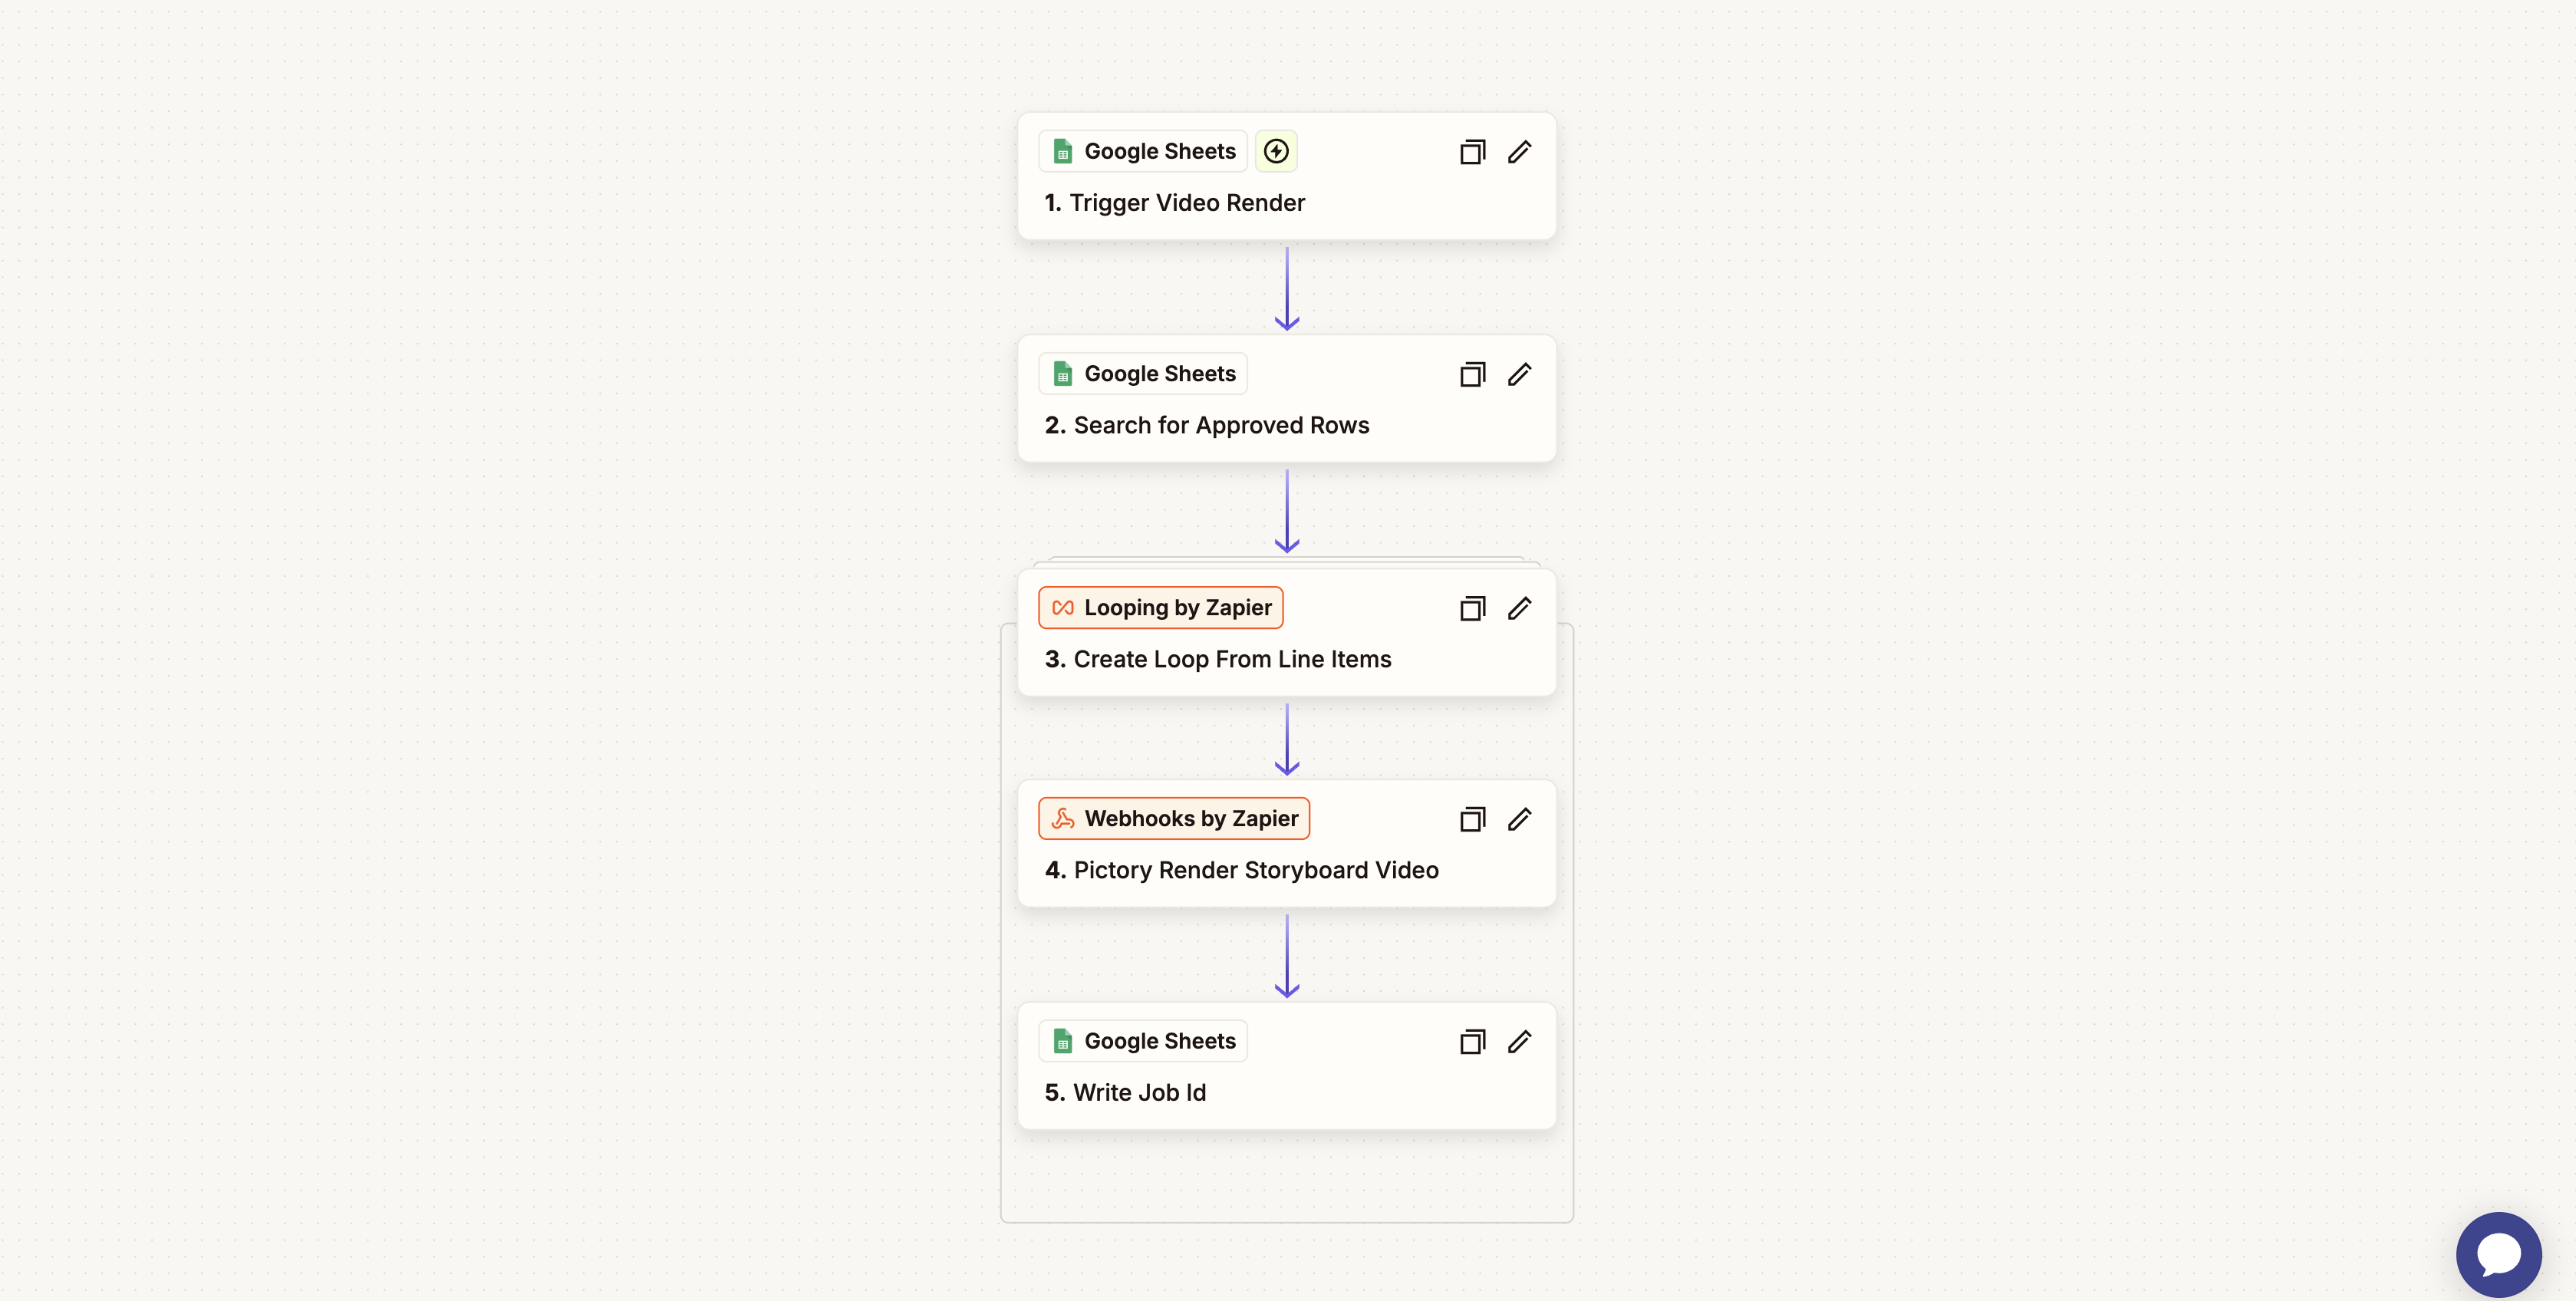 ### Step Breakdown
#### 1. Trigger Video Render (Google Sheets: New or Updated Spreadsheet Row)
| Property | Value |
| ----------- | ------------------------------------------- |
| **App** | Google Sheets |
| **Trigger** | New or Updated Spreadsheet Row |
| **Sheet** | Video Trigger |
| **Purpose** | Detects new rows added to the trigger sheet |
This step monitors the "Video Trigger" sheet for new rows. When a new datetime value is added to a row, Zapier detects it and triggers the Zap execution. Zapier automatically polls for new rows based on your plan's polling interval.
***
#### 2. Search for Approved Rows (Google Sheets: Lookup Spreadsheet Row)
| Property | Value |
| ----------------- | --------------------------------------------------- |
| **App** | Google Sheets |
| **Action** | Lookup Spreadsheet Row |
| **Sheet** | Videos |
| **Lookup Column** | Column E (Review Status) |
| **Lookup Value** | `approved` |
| **Purpose** | Finds video entries that are approved for rendering |
This step searches the "Videos" sheet for rows where the **Review Status** column contains `approved`. Only approved entries proceed to the rendering step. The search returns up to 10 matching rows from the bottom of the sheet.
***
#### 3. Create Loop From Line Items (Looping by Zapier)
| Property | Value |
| ---------------- | ----------------------------------------------- |
| **App** | Looping by Zapier |
| **Action** | Create Loop From Line Items |
| **Input Values** | Story, Row Number, Video Name, Review Status |
| **Purpose** | Iterates through each approved row individually |
This step takes the grouped search results from the previous step and loops through each matched row one at a time. For each iteration, it passes the story text, row number, video name, and review status to the subsequent steps. This ensures that each approved video entry is processed individually through the Pictory API.
***
#### 4. Pictory Render Storyboard Video (Webhooks by Zapier: Custom Request)
| Property | Value |
| ----------- | --------------------------------------------------------------- |
| **App** | Webhooks by Zapier |
| **Action** | Custom Request |
| **Method** | `POST` |
| **URL** | `https://api.pictory.ai/pictoryapis/v2/video/storyboard/render` |
| **Purpose** | Submits the video rendering request to Pictory |
This step sends a `POST` request to the Pictory [Render Storyboard Video](/api-reference/videos/render-storyboard-video) API with the following configuration:
**Headers:**
* `Content-Type`: `application/json`
* `Authorization`: Your Pictory API key
**Request Body:**
```json theme={null}
{
"videoName": "demo_text_to_video",
"webhook": "YOUR_ZAP_2_WEBHOOK_URL",
"smartLayoutName": "Wanderlust",
"voiceOver": {
"enabled": true,
"aiVoices": [
{
"speaker": "Brian"
}
]
},
"backgroundMusic": {
"enabled": true,
"volume": 0.1,
"autoMusic": true
},
"scenes": [
{
"story": "{{story_from_spreadsheet}}",
"createSceneOnNewLine": true,
"createSceneOnEndOfSentence": true
}
]
}
```
Key fields:
| Field | Description |
| ----------------- | -------------------------------------------------------------------------------------- |
| `videoName` | Name assigned to the generated video |
| `webhook` | The URL of your Zap 2 webhook (Pictory sends a callback here when rendering completes) |
| `smartLayoutName` | Visual layout theme applied to the video |
| `voiceOver` | AI voice configuration with the selected speaker |
| `backgroundMusic` | Auto-selected background music at 10% volume |
| `scenes[].story` | The story text pulled from the spreadsheet's Story column via the Looping step |
Replace `YOUR_ZAP_2_WEBHOOK_URL` with the actual webhook URL from Zap 2. This URL is generated after creating the webhook trigger in Zap 2.
**Response:** Returns a `jobId` that uniquely identifies the rendering job.
```json theme={null}
{
"data": {
"jobId": "abc123-def456-..."
}
}
```
***
#### 5. Write Job Id (Google Sheets: Update Spreadsheet Row)
| Property | Value |
| ------------ | ------------------------------------------------------- |
| **App** | Google Sheets |
| **Action** | Update Spreadsheet Row |
| **Sheet** | Videos |
| **Row** | The matching row number from the Looping step |
| **Column C** | `{{data.jobId}}` from the API response |
| **Purpose** | Records the job ID for tracking and webhook correlation |
This step writes the `jobId` returned by the Pictory API into the **Job Id** column of the corresponding row. This value is used by Zap 2 to locate the correct row when the webhook fires. The row is updated in place, preserving all existing column values.
***
## Zap 2: Video Rendered Webhook
This Zap listens for webhook callbacks from Pictory when a video finishes rendering, then updates the spreadsheet with the video URL and marks the row as completed.
### Step Breakdown
#### 1. Trigger Video Render (Google Sheets: New or Updated Spreadsheet Row)
| Property | Value |
| ----------- | ------------------------------------------- |
| **App** | Google Sheets |
| **Trigger** | New or Updated Spreadsheet Row |
| **Sheet** | Video Trigger |
| **Purpose** | Detects new rows added to the trigger sheet |
This step monitors the "Video Trigger" sheet for new rows. When a new datetime value is added to a row, Zapier detects it and triggers the Zap execution. Zapier automatically polls for new rows based on your plan's polling interval.
***
#### 2. Search for Approved Rows (Google Sheets: Lookup Spreadsheet Row)
| Property | Value |
| ----------------- | --------------------------------------------------- |
| **App** | Google Sheets |
| **Action** | Lookup Spreadsheet Row |
| **Sheet** | Videos |
| **Lookup Column** | Column E (Review Status) |
| **Lookup Value** | `approved` |
| **Purpose** | Finds video entries that are approved for rendering |
This step searches the "Videos" sheet for rows where the **Review Status** column contains `approved`. Only approved entries proceed to the rendering step. The search returns up to 10 matching rows from the bottom of the sheet.
***
#### 3. Create Loop From Line Items (Looping by Zapier)
| Property | Value |
| ---------------- | ----------------------------------------------- |
| **App** | Looping by Zapier |
| **Action** | Create Loop From Line Items |
| **Input Values** | Story, Row Number, Video Name, Review Status |
| **Purpose** | Iterates through each approved row individually |
This step takes the grouped search results from the previous step and loops through each matched row one at a time. For each iteration, it passes the story text, row number, video name, and review status to the subsequent steps. This ensures that each approved video entry is processed individually through the Pictory API.
***
#### 4. Pictory Render Storyboard Video (Webhooks by Zapier: Custom Request)
| Property | Value |
| ----------- | --------------------------------------------------------------- |
| **App** | Webhooks by Zapier |
| **Action** | Custom Request |
| **Method** | `POST` |
| **URL** | `https://api.pictory.ai/pictoryapis/v2/video/storyboard/render` |
| **Purpose** | Submits the video rendering request to Pictory |
This step sends a `POST` request to the Pictory [Render Storyboard Video](/api-reference/videos/render-storyboard-video) API with the following configuration:
**Headers:**
* `Content-Type`: `application/json`
* `Authorization`: Your Pictory API key
**Request Body:**
```json theme={null}
{
"videoName": "demo_text_to_video",
"webhook": "YOUR_ZAP_2_WEBHOOK_URL",
"smartLayoutName": "Wanderlust",
"voiceOver": {
"enabled": true,
"aiVoices": [
{
"speaker": "Brian"
}
]
},
"backgroundMusic": {
"enabled": true,
"volume": 0.1,
"autoMusic": true
},
"scenes": [
{
"story": "{{story_from_spreadsheet}}",
"createSceneOnNewLine": true,
"createSceneOnEndOfSentence": true
}
]
}
```
Key fields:
| Field | Description |
| ----------------- | -------------------------------------------------------------------------------------- |
| `videoName` | Name assigned to the generated video |
| `webhook` | The URL of your Zap 2 webhook (Pictory sends a callback here when rendering completes) |
| `smartLayoutName` | Visual layout theme applied to the video |
| `voiceOver` | AI voice configuration with the selected speaker |
| `backgroundMusic` | Auto-selected background music at 10% volume |
| `scenes[].story` | The story text pulled from the spreadsheet's Story column via the Looping step |
Replace `YOUR_ZAP_2_WEBHOOK_URL` with the actual webhook URL from Zap 2. This URL is generated after creating the webhook trigger in Zap 2.
**Response:** Returns a `jobId` that uniquely identifies the rendering job.
```json theme={null}
{
"data": {
"jobId": "abc123-def456-..."
}
}
```
***
#### 5. Write Job Id (Google Sheets: Update Spreadsheet Row)
| Property | Value |
| ------------ | ------------------------------------------------------- |
| **App** | Google Sheets |
| **Action** | Update Spreadsheet Row |
| **Sheet** | Videos |
| **Row** | The matching row number from the Looping step |
| **Column C** | `{{data.jobId}}` from the API response |
| **Purpose** | Records the job ID for tracking and webhook correlation |
This step writes the `jobId` returned by the Pictory API into the **Job Id** column of the corresponding row. This value is used by Zap 2 to locate the correct row when the webhook fires. The row is updated in place, preserving all existing column values.
***
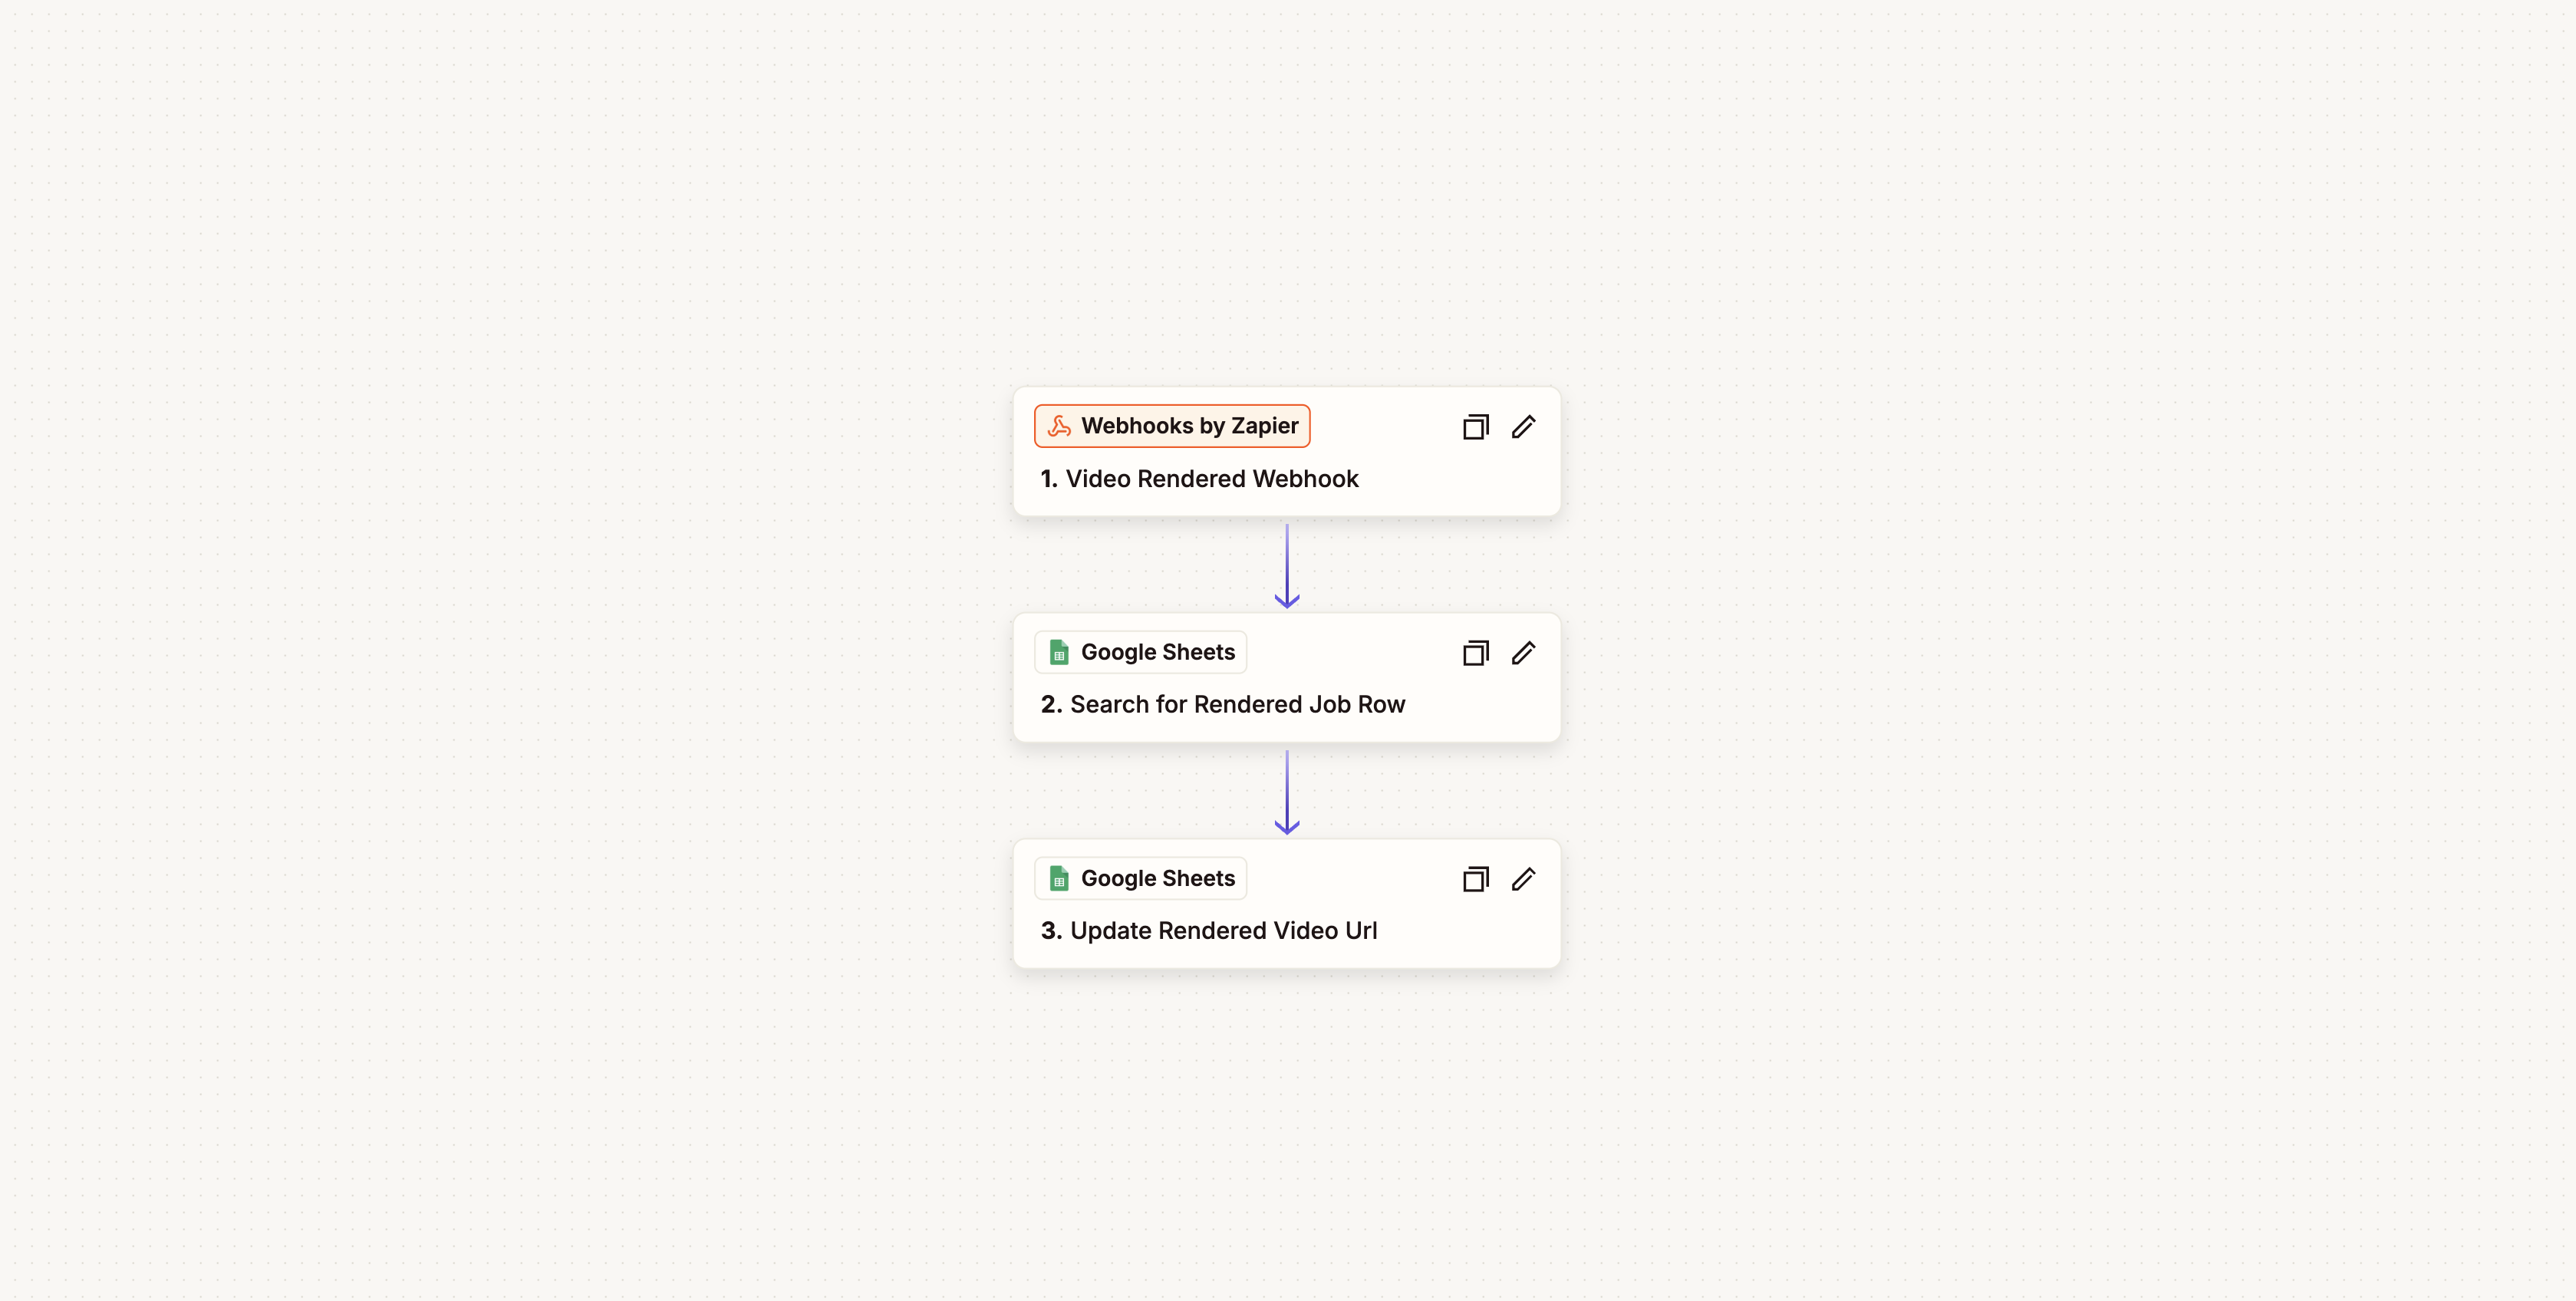
## Zap 2: Video Rendered Webhook
This Zap listens for webhook callbacks from Pictory when a video finishes rendering, then updates the spreadsheet with the video URL and marks the row as completed.
 ### Step Breakdown
#### 1. Video Rendered Webhook (Webhooks by Zapier: Catch Hook)
| Property | Value |
| ----------- | ----------------------------------------------------------------- |
| **App** | Webhooks by Zapier |
| **Trigger** | Catch Hook |
| **Purpose** | Receives the callback from Pictory when video rendering completes |
This step creates a webhook endpoint in Zapier. When Pictory finishes rendering a video, it sends a `POST` request to this webhook URL with the following payload:
```json theme={null}
{
"job_id": "abc123-def456-...",
"success": true,
"data": {
"status": "completed",
"progress": 100,
"videoURL": "https://...",
"videoShareURL": "https://...",
"videoEmbedURL": "https://...",
"audioURL": "https://...",
"thumbnail": "https://...",
"srtFile": "https://...",
"txtFile": "https://...",
"vttFile": "https://...",
"videoDuration": 45.2,
"encodingDuration": 30.5
},
"userId": "user-id"
}
```
Copy the webhook URL generated by this step and paste it into the `webhook` field of the Pictory API request body in Zap 1.
***
#### 2. Search for Rendered Job Row (Google Sheets: Lookup Spreadsheet Row)
| Property | Value |
| ----------------- | -------------------------------------------------------- |
| **App** | Google Sheets |
| **Action** | Lookup Spreadsheet Row |
| **Sheet** | Videos |
| **Lookup Column** | Column C (Job Id) |
| **Lookup Value** | `{{job_id}}` from the webhook payload |
| **Purpose** | Finds the spreadsheet row that matches the completed job |
This step searches the "Videos" sheet for the row where the **Job Id** column matches the `job_id` received from the webhook. This correlates the webhook callback with the correct video entry.
***
#### 3. Update Rendered Video Url (Google Sheets: Update Spreadsheet Row)
| Property | Value |
| ------------ | -------------------------------------------------------------- |
| **App** | Google Sheets |
| **Action** | Update Spreadsheet Row |
| **Sheet** | Videos |
| **Row** | The matching row from the search step |
| **Column D** | `{{data.videoURL}}` from the webhook payload |
| **Column E** | `done` |
| **Purpose** | Writes the rendered video URL and marks the entry as completed |
Once the matching row is found, this step updates the **Video Url** column with the download URL of the rendered video and sets the **Review Status** column from `approved` to `done`, indicating that the video has been successfully rendered and the URL is available.
## Import the Zaps
Both Zaps are available as pre-configured JSON files that can be imported into your Zapier account via the Zapier Transfer tool. These files contain the complete step configuration, app connections, and data mappings.
Download the Zap files before proceeding:
* [Render Text To Video From Google Sheet](/integrations/zapier/Render%20Text%20To%20Video%20From%20Google%20Sheet%20Zap.json) (Zap 1)
* [Pictory Video Rendered Webhook](/integrations/zapier/Pictory%20Video%20Rendered%20Webhook%20Zap.json) (Zap 2)
Never share Zap files containing your actual API key. Always use placeholder values like `YOUR_PICTORY_API_KEY` in shared files and set the real key only in your private Zapier account.
### Step-by-Step Import and Configuration
Follow this order to ensure the webhook URL is available when configuring Zap 1. Zap 2 must be created first because it generates the webhook URL that Zap 1 needs.
Create a new Google Sheets spreadsheet with two sheets named **Videos** and **Video Trigger**, using the column structure described in the [Google Sheets Setup](#google-sheets-setup) section above. Add at least one video entry to the "Videos" sheet with a video name, story text, and set the **Review Status** to `approved`.
1. Log in to your [Zapier](https://zapier.com) account
2. Click **Create** in the top navigation bar and select **New Zap**
3. For the trigger, search for **Webhooks by Zapier** and select **Catch Hook** as the trigger event
4. Click **Continue** — Zapier generates a unique webhook URL. **Copy this URL** — it is required when configuring Zap 1
5. Optionally, click **Test trigger** to verify the webhook is active (you can send a test payload later)
1. Click the **+** button to add a new step
2. Search for **Google Sheets** and select **Lookup Spreadsheet Row** as the action
3. Connect your Google account when prompted
4. Select your spreadsheet and choose the **Videos** sheet
5. Set the **Lookup Column** to **Job Id** (Column C)
6. Map the **Lookup Value** to `{{job_id}}` from the webhook trigger data
1. Click the **+** button to add another step
2. Search for **Google Sheets** and select **Update Spreadsheet Row** as the action
3. Use the same Google Sheets connection
4. Select your spreadsheet and choose the **Videos** sheet
5. Set the **Row** field to the row number from the Lookup step
6. Map **Column D** (Video Url) to `{{data__videoURL}}` from the webhook payload
7. Set **Column E** (Review Status) to `done`
Click **Publish** to activate Zap 2. The Zap is set to trigger instantly whenever Pictory sends a webhook callback.
1. Go back to the Zapier dashboard and click **Create** then **New Zap**
2. For the trigger, search for **Google Sheets** and select **New or Updated Spreadsheet Row** as the trigger event
3. Connect your Google account and select your spreadsheet
4. Choose the **Video Trigger** sheet and set the **Trigger Column** to **Trigger DateTime**
1. Add a new step with **Google Sheets** and select **Lookup Spreadsheet Row**
2. Select your spreadsheet and choose the **Videos** sheet
3. Set the **Lookup Column** to **Review Status** (Column E)
4. Set the **Lookup Value** to `approved`
1. Add a new step with **Looping by Zapier** and select **Create Loop From Line Items**
2. Map the input values from the search results: **Story**, **Row Number**, **Video Name**, and **Review Status**
3. This step iterates through each matched row individually for processing
1. Add a new step with **Webhooks by Zapier** and select **Custom Request**
2. Set the **Method** to `POST`
3. Set the **URL** to `https://api.pictory.ai/pictoryapis/v2/video/storyboard/render`
4. Add the following headers:
* `Content-Type`: `application/json`
* `Authorization`: Your Pictory API key (e.g., `pictai_xxxx...`)
5. Paste the JSON request body (shown in the [Pictory Render Storyboard Video](#4-pictory-render-storyboard-video-webhooks-by-zapier-custom-request) section above) into the **Data** field
6. Replace `YOUR_ZAP_2_WEBHOOK_URL` with the webhook URL you copied from Zap 2 in Step 2
7. Map the `story` field to the story value from the Looping step
1. Add a new step with **Google Sheets** and select **Update Spreadsheet Row**
2. Select your spreadsheet and choose the **Videos** sheet
3. Set the **Row** field to the row number from the Looping step
4. Map **Column C** (Job Id) to `{{data__jobId}}` from the Webhooks step response
5. Preserve the existing values for Columns A, B, and E by mapping them from the Looping step
1. Click **Publish** to activate Zap 1. Zapier will poll for new rows on the "Video Trigger" sheet at regular intervals based on your plan.
2. To initiate your first video render, add a datetime value (e.g., the current date and time) to a new row in the **Video Trigger** sheet
3. During the next polling cycle, Zap 1 detects the new row, identifies approved entries in the Videos sheet, submits the render request, and writes the job ID back to the spreadsheet
4. Upon rendering completion, Pictory sends a webhook callback to Zap 2, which updates the video URL and sets the review status to `done`
After setting up each Zap, use Zapier's **Test** feature for each step to verify that all connections, spreadsheet references, and API credentials are configured correctly before publishing.
## Zapier vs Make.com: Key Differences
If you are familiar with the [Make.com integration](/integrations/make/google-sheet-text-to-video-make-integration), note the following differences in the Zapier implementation:
| Feature | Zapier | Make.com |
| ----------------- | ------------------------------------------------------------- | ----------------------------------------------- |
| **Terminology** | Zaps, Steps | Scenarios, Modules |
| **Looping** | Requires explicit "Looping by Zapier" step | Built-in iterator handles arrays automatically |
| **Webhook Setup** | "Webhooks by Zapier: Catch Hook" trigger | "Custom Webhook" module |
| **HTTP Requests** | "Webhooks by Zapier: Custom Request" action | "HTTP: Make a Request" module |
| **Row Updates** | Single "Update Spreadsheet Row" step updates multiple columns | Separate "Update a Cell" module for each column |
| **Import Format** | JSON Zap files | Blueprint JSON files |
## Best Practices
Store your Pictory API key securely. In Zapier, the key is entered directly into the Custom Request step's headers. Avoid sharing Zap configurations that contain your actual API key. Always replace it with a placeholder value before exporting.
Use Zapier's **Zap History** to monitor incoming webhook data and step execution results. If a webhook fails to arrive, verify that the webhook URL in Zap 1's request body matches the URL shown in Zap 2's Catch Hook trigger.
The webhook payload includes a `success` field. You can add a **Filter** step or **Paths** step after the webhook trigger to handle failed renders separately, such as sending an email notification or updating the spreadsheet with an error status.
Zap 1 processes all approved rows in a single execution using the Looping step. Each loop iteration submits one video for rendering. To render multiple videos, simply add multiple rows to the "Videos" sheet with the review status set to `approved`, then add a trigger row to the "Video Trigger" sheet.
On the Zapier free plan, you are limited to 5 single-step Zaps and 100 tasks per month. Since these Zaps use multiple steps, a paid plan is required. The Starter plan supports multi-step Zaps and provides 750 tasks per month. Monitor your task usage in the Zapier dashboard under **Settings > Usage**.
## Troubleshooting
**Cause:** The API key in the Custom Request step's Authorization header is incorrect or missing.
**Resolution:**
1. Open the Pictory Render Storyboard Video step in Zap 1
2. Verify the Authorization header contains your complete API key (e.g., `pictai_xxxx...`)
3. Do not add a `Bearer` prefix — use the API key directly
**Cause:** The webhook URL in Zap 1's request body does not match the URL generated by Zap 2, or Zap 2 is not published.
**Resolution:**
1. Confirm that Zap 2 is published and active
2. Open the Catch Hook trigger in Zap 2 and copy the webhook URL
3. Verify that the `webhook` field in the Pictory API request body in Zap 1 exactly matches this URL
4. Check Zap History for both Zaps to review execution logs
**Cause:** The Google Sheets connection has expired, or the spreadsheet and sheet names do not match the configuration.
**Resolution:**
1. Open each Google Sheets step and verify the connection is active
2. Reconnect your Google account if prompted
3. Confirm that the spreadsheet name and sheet names match your Google Sheets document
4. Verify that column references (C, D, E) align with your spreadsheet structure
**Cause:** The search step is returning grouped results that the Looping step cannot parse, or the loop input values are not mapped correctly.
**Resolution:**
1. Open the Search for Approved Rows step and verify it returns results in the expected format
2. In the Looping step, ensure each input value (Story, Row, Video Name, Review Status) is mapped to the correct field from the search results
3. Test the search step independently to confirm it returns the expected rows
## Next Steps
Full API reference for the render endpoint used in Zap 1
API reference for checking video rendering progress
Learn about storyboard payload options and scene configuration
Alternative workflow automation using Make.com with the same two-scenario approach
### Step Breakdown
#### 1. Video Rendered Webhook (Webhooks by Zapier: Catch Hook)
| Property | Value |
| ----------- | ----------------------------------------------------------------- |
| **App** | Webhooks by Zapier |
| **Trigger** | Catch Hook |
| **Purpose** | Receives the callback from Pictory when video rendering completes |
This step creates a webhook endpoint in Zapier. When Pictory finishes rendering a video, it sends a `POST` request to this webhook URL with the following payload:
```json theme={null}
{
"job_id": "abc123-def456-...",
"success": true,
"data": {
"status": "completed",
"progress": 100,
"videoURL": "https://...",
"videoShareURL": "https://...",
"videoEmbedURL": "https://...",
"audioURL": "https://...",
"thumbnail": "https://...",
"srtFile": "https://...",
"txtFile": "https://...",
"vttFile": "https://...",
"videoDuration": 45.2,
"encodingDuration": 30.5
},
"userId": "user-id"
}
```
Copy the webhook URL generated by this step and paste it into the `webhook` field of the Pictory API request body in Zap 1.
***
#### 2. Search for Rendered Job Row (Google Sheets: Lookup Spreadsheet Row)
| Property | Value |
| ----------------- | -------------------------------------------------------- |
| **App** | Google Sheets |
| **Action** | Lookup Spreadsheet Row |
| **Sheet** | Videos |
| **Lookup Column** | Column C (Job Id) |
| **Lookup Value** | `{{job_id}}` from the webhook payload |
| **Purpose** | Finds the spreadsheet row that matches the completed job |
This step searches the "Videos" sheet for the row where the **Job Id** column matches the `job_id` received from the webhook. This correlates the webhook callback with the correct video entry.
***
#### 3. Update Rendered Video Url (Google Sheets: Update Spreadsheet Row)
| Property | Value |
| ------------ | -------------------------------------------------------------- |
| **App** | Google Sheets |
| **Action** | Update Spreadsheet Row |
| **Sheet** | Videos |
| **Row** | The matching row from the search step |
| **Column D** | `{{data.videoURL}}` from the webhook payload |
| **Column E** | `done` |
| **Purpose** | Writes the rendered video URL and marks the entry as completed |
Once the matching row is found, this step updates the **Video Url** column with the download URL of the rendered video and sets the **Review Status** column from `approved` to `done`, indicating that the video has been successfully rendered and the URL is available.
## Import the Zaps
Both Zaps are available as pre-configured JSON files that can be imported into your Zapier account via the Zapier Transfer tool. These files contain the complete step configuration, app connections, and data mappings.
Download the Zap files before proceeding:
* [Render Text To Video From Google Sheet](/integrations/zapier/Render%20Text%20To%20Video%20From%20Google%20Sheet%20Zap.json) (Zap 1)
* [Pictory Video Rendered Webhook](/integrations/zapier/Pictory%20Video%20Rendered%20Webhook%20Zap.json) (Zap 2)
Never share Zap files containing your actual API key. Always use placeholder values like `YOUR_PICTORY_API_KEY` in shared files and set the real key only in your private Zapier account.
### Step-by-Step Import and Configuration
Follow this order to ensure the webhook URL is available when configuring Zap 1. Zap 2 must be created first because it generates the webhook URL that Zap 1 needs.
Create a new Google Sheets spreadsheet with two sheets named **Videos** and **Video Trigger**, using the column structure described in the [Google Sheets Setup](#google-sheets-setup) section above. Add at least one video entry to the "Videos" sheet with a video name, story text, and set the **Review Status** to `approved`.
1. Log in to your [Zapier](https://zapier.com) account
2. Click **Create** in the top navigation bar and select **New Zap**
3. For the trigger, search for **Webhooks by Zapier** and select **Catch Hook** as the trigger event
4. Click **Continue** — Zapier generates a unique webhook URL. **Copy this URL** — it is required when configuring Zap 1
5. Optionally, click **Test trigger** to verify the webhook is active (you can send a test payload later)
1. Click the **+** button to add a new step
2. Search for **Google Sheets** and select **Lookup Spreadsheet Row** as the action
3. Connect your Google account when prompted
4. Select your spreadsheet and choose the **Videos** sheet
5. Set the **Lookup Column** to **Job Id** (Column C)
6. Map the **Lookup Value** to `{{job_id}}` from the webhook trigger data
1. Click the **+** button to add another step
2. Search for **Google Sheets** and select **Update Spreadsheet Row** as the action
3. Use the same Google Sheets connection
4. Select your spreadsheet and choose the **Videos** sheet
5. Set the **Row** field to the row number from the Lookup step
6. Map **Column D** (Video Url) to `{{data__videoURL}}` from the webhook payload
7. Set **Column E** (Review Status) to `done`
Click **Publish** to activate Zap 2. The Zap is set to trigger instantly whenever Pictory sends a webhook callback.
1. Go back to the Zapier dashboard and click **Create** then **New Zap**
2. For the trigger, search for **Google Sheets** and select **New or Updated Spreadsheet Row** as the trigger event
3. Connect your Google account and select your spreadsheet
4. Choose the **Video Trigger** sheet and set the **Trigger Column** to **Trigger DateTime**
1. Add a new step with **Google Sheets** and select **Lookup Spreadsheet Row**
2. Select your spreadsheet and choose the **Videos** sheet
3. Set the **Lookup Column** to **Review Status** (Column E)
4. Set the **Lookup Value** to `approved`
1. Add a new step with **Looping by Zapier** and select **Create Loop From Line Items**
2. Map the input values from the search results: **Story**, **Row Number**, **Video Name**, and **Review Status**
3. This step iterates through each matched row individually for processing
1. Add a new step with **Webhooks by Zapier** and select **Custom Request**
2. Set the **Method** to `POST`
3. Set the **URL** to `https://api.pictory.ai/pictoryapis/v2/video/storyboard/render`
4. Add the following headers:
* `Content-Type`: `application/json`
* `Authorization`: Your Pictory API key (e.g., `pictai_xxxx...`)
5. Paste the JSON request body (shown in the [Pictory Render Storyboard Video](#4-pictory-render-storyboard-video-webhooks-by-zapier-custom-request) section above) into the **Data** field
6. Replace `YOUR_ZAP_2_WEBHOOK_URL` with the webhook URL you copied from Zap 2 in Step 2
7. Map the `story` field to the story value from the Looping step
1. Add a new step with **Google Sheets** and select **Update Spreadsheet Row**
2. Select your spreadsheet and choose the **Videos** sheet
3. Set the **Row** field to the row number from the Looping step
4. Map **Column C** (Job Id) to `{{data__jobId}}` from the Webhooks step response
5. Preserve the existing values for Columns A, B, and E by mapping them from the Looping step
1. Click **Publish** to activate Zap 1. Zapier will poll for new rows on the "Video Trigger" sheet at regular intervals based on your plan.
2. To initiate your first video render, add a datetime value (e.g., the current date and time) to a new row in the **Video Trigger** sheet
3. During the next polling cycle, Zap 1 detects the new row, identifies approved entries in the Videos sheet, submits the render request, and writes the job ID back to the spreadsheet
4. Upon rendering completion, Pictory sends a webhook callback to Zap 2, which updates the video URL and sets the review status to `done`
After setting up each Zap, use Zapier's **Test** feature for each step to verify that all connections, spreadsheet references, and API credentials are configured correctly before publishing.
## Zapier vs Make.com: Key Differences
If you are familiar with the [Make.com integration](/integrations/make/google-sheet-text-to-video-make-integration), note the following differences in the Zapier implementation:
| Feature | Zapier | Make.com |
| ----------------- | ------------------------------------------------------------- | ----------------------------------------------- |
| **Terminology** | Zaps, Steps | Scenarios, Modules |
| **Looping** | Requires explicit "Looping by Zapier" step | Built-in iterator handles arrays automatically |
| **Webhook Setup** | "Webhooks by Zapier: Catch Hook" trigger | "Custom Webhook" module |
| **HTTP Requests** | "Webhooks by Zapier: Custom Request" action | "HTTP: Make a Request" module |
| **Row Updates** | Single "Update Spreadsheet Row" step updates multiple columns | Separate "Update a Cell" module for each column |
| **Import Format** | JSON Zap files | Blueprint JSON files |
## Best Practices
Store your Pictory API key securely. In Zapier, the key is entered directly into the Custom Request step's headers. Avoid sharing Zap configurations that contain your actual API key. Always replace it with a placeholder value before exporting.
Use Zapier's **Zap History** to monitor incoming webhook data and step execution results. If a webhook fails to arrive, verify that the webhook URL in Zap 1's request body matches the URL shown in Zap 2's Catch Hook trigger.
The webhook payload includes a `success` field. You can add a **Filter** step or **Paths** step after the webhook trigger to handle failed renders separately, such as sending an email notification or updating the spreadsheet with an error status.
Zap 1 processes all approved rows in a single execution using the Looping step. Each loop iteration submits one video for rendering. To render multiple videos, simply add multiple rows to the "Videos" sheet with the review status set to `approved`, then add a trigger row to the "Video Trigger" sheet.
On the Zapier free plan, you are limited to 5 single-step Zaps and 100 tasks per month. Since these Zaps use multiple steps, a paid plan is required. The Starter plan supports multi-step Zaps and provides 750 tasks per month. Monitor your task usage in the Zapier dashboard under **Settings > Usage**.
## Troubleshooting
**Cause:** The API key in the Custom Request step's Authorization header is incorrect or missing.
**Resolution:**
1. Open the Pictory Render Storyboard Video step in Zap 1
2. Verify the Authorization header contains your complete API key (e.g., `pictai_xxxx...`)
3. Do not add a `Bearer` prefix — use the API key directly
**Cause:** The webhook URL in Zap 1's request body does not match the URL generated by Zap 2, or Zap 2 is not published.
**Resolution:**
1. Confirm that Zap 2 is published and active
2. Open the Catch Hook trigger in Zap 2 and copy the webhook URL
3. Verify that the `webhook` field in the Pictory API request body in Zap 1 exactly matches this URL
4. Check Zap History for both Zaps to review execution logs
**Cause:** The Google Sheets connection has expired, or the spreadsheet and sheet names do not match the configuration.
**Resolution:**
1. Open each Google Sheets step and verify the connection is active
2. Reconnect your Google account if prompted
3. Confirm that the spreadsheet name and sheet names match your Google Sheets document
4. Verify that column references (C, D, E) align with your spreadsheet structure
**Cause:** The search step is returning grouped results that the Looping step cannot parse, or the loop input values are not mapped correctly.
**Resolution:**
1. Open the Search for Approved Rows step and verify it returns results in the expected format
2. In the Looping step, ensure each input value (Story, Row, Video Name, Review Status) is mapped to the correct field from the search results
3. Test the search step independently to confirm it returns the expected rows
## Next Steps
Full API reference for the render endpoint used in Zap 1
API reference for checking video rendering progress
Learn about storyboard payload options and scene configuration
Alternative workflow automation using Make.com with the same two-scenario approach