> ## Documentation Index
> Fetch the complete documentation index at: https://docs.pictory.ai/llms.txt
> Use this file to discover all available pages before exploring further.
# Create Template from Project
> Create reusable video templates from Pictory projects with advanced scene manipulation, layer overrides, and dynamic content insertion
This guide covers an advanced use-case where you design a project with well-defined layouts, subtitles, header text, and layered images or videos in the Pictory App, then use the API to create a reusable template. You can dynamically replace text, images, and videos at runtime to create new videos based on your project's design.
## What You'll Learn
Convert Pictory projects into reusable API templates
Use placeholder variables for personalization at scale
Modify existing scene content including subtitles and layers
Insert, replace, or append new scenes to templates
Replace text, images, and videos programmatically
Use variables and overrides together for maximum flexibility
## Before You Begin
Make sure you have:
* A Pictory account ([create one here](https://app.pictory.ai))
* A Pictory API key ([get one here](https://app.pictory.ai/api-access))
* A project created in Pictory with your desired design and layout
* Node.js or Python installed on your machine
```bash npm theme={null}
npm install axios
```
```bash pip theme={null}
pip install requests
```
## Workflow Overview
```mermaid theme={null}
flowchart LR
A[Create Project in Pictory App] --> B[Download .pictai File]
B --> C[Upload to Template API]
C --> D[Get Template Details]
D --> E[Create Videos with Overrides]
```
## Step-by-Step Guide
### Step 1: Create a Project in Pictory App
Design your video project in the [Pictory App](https://app.pictory.ai) with all the elements you want to reuse:
1. Open [app.pictory.ai](https://app.pictory.ai) and create a new project
2. Design your scenes with:
* **Background visuals** (images or videos)
* **Text layers** (headers, titles, captions)
* **Subtitles** for voice-over narration
* **Layouts** that define visual composition
3. Add template variables using `{{variableName}}` syntax for dynamic content
4. Preview and finalize your project design
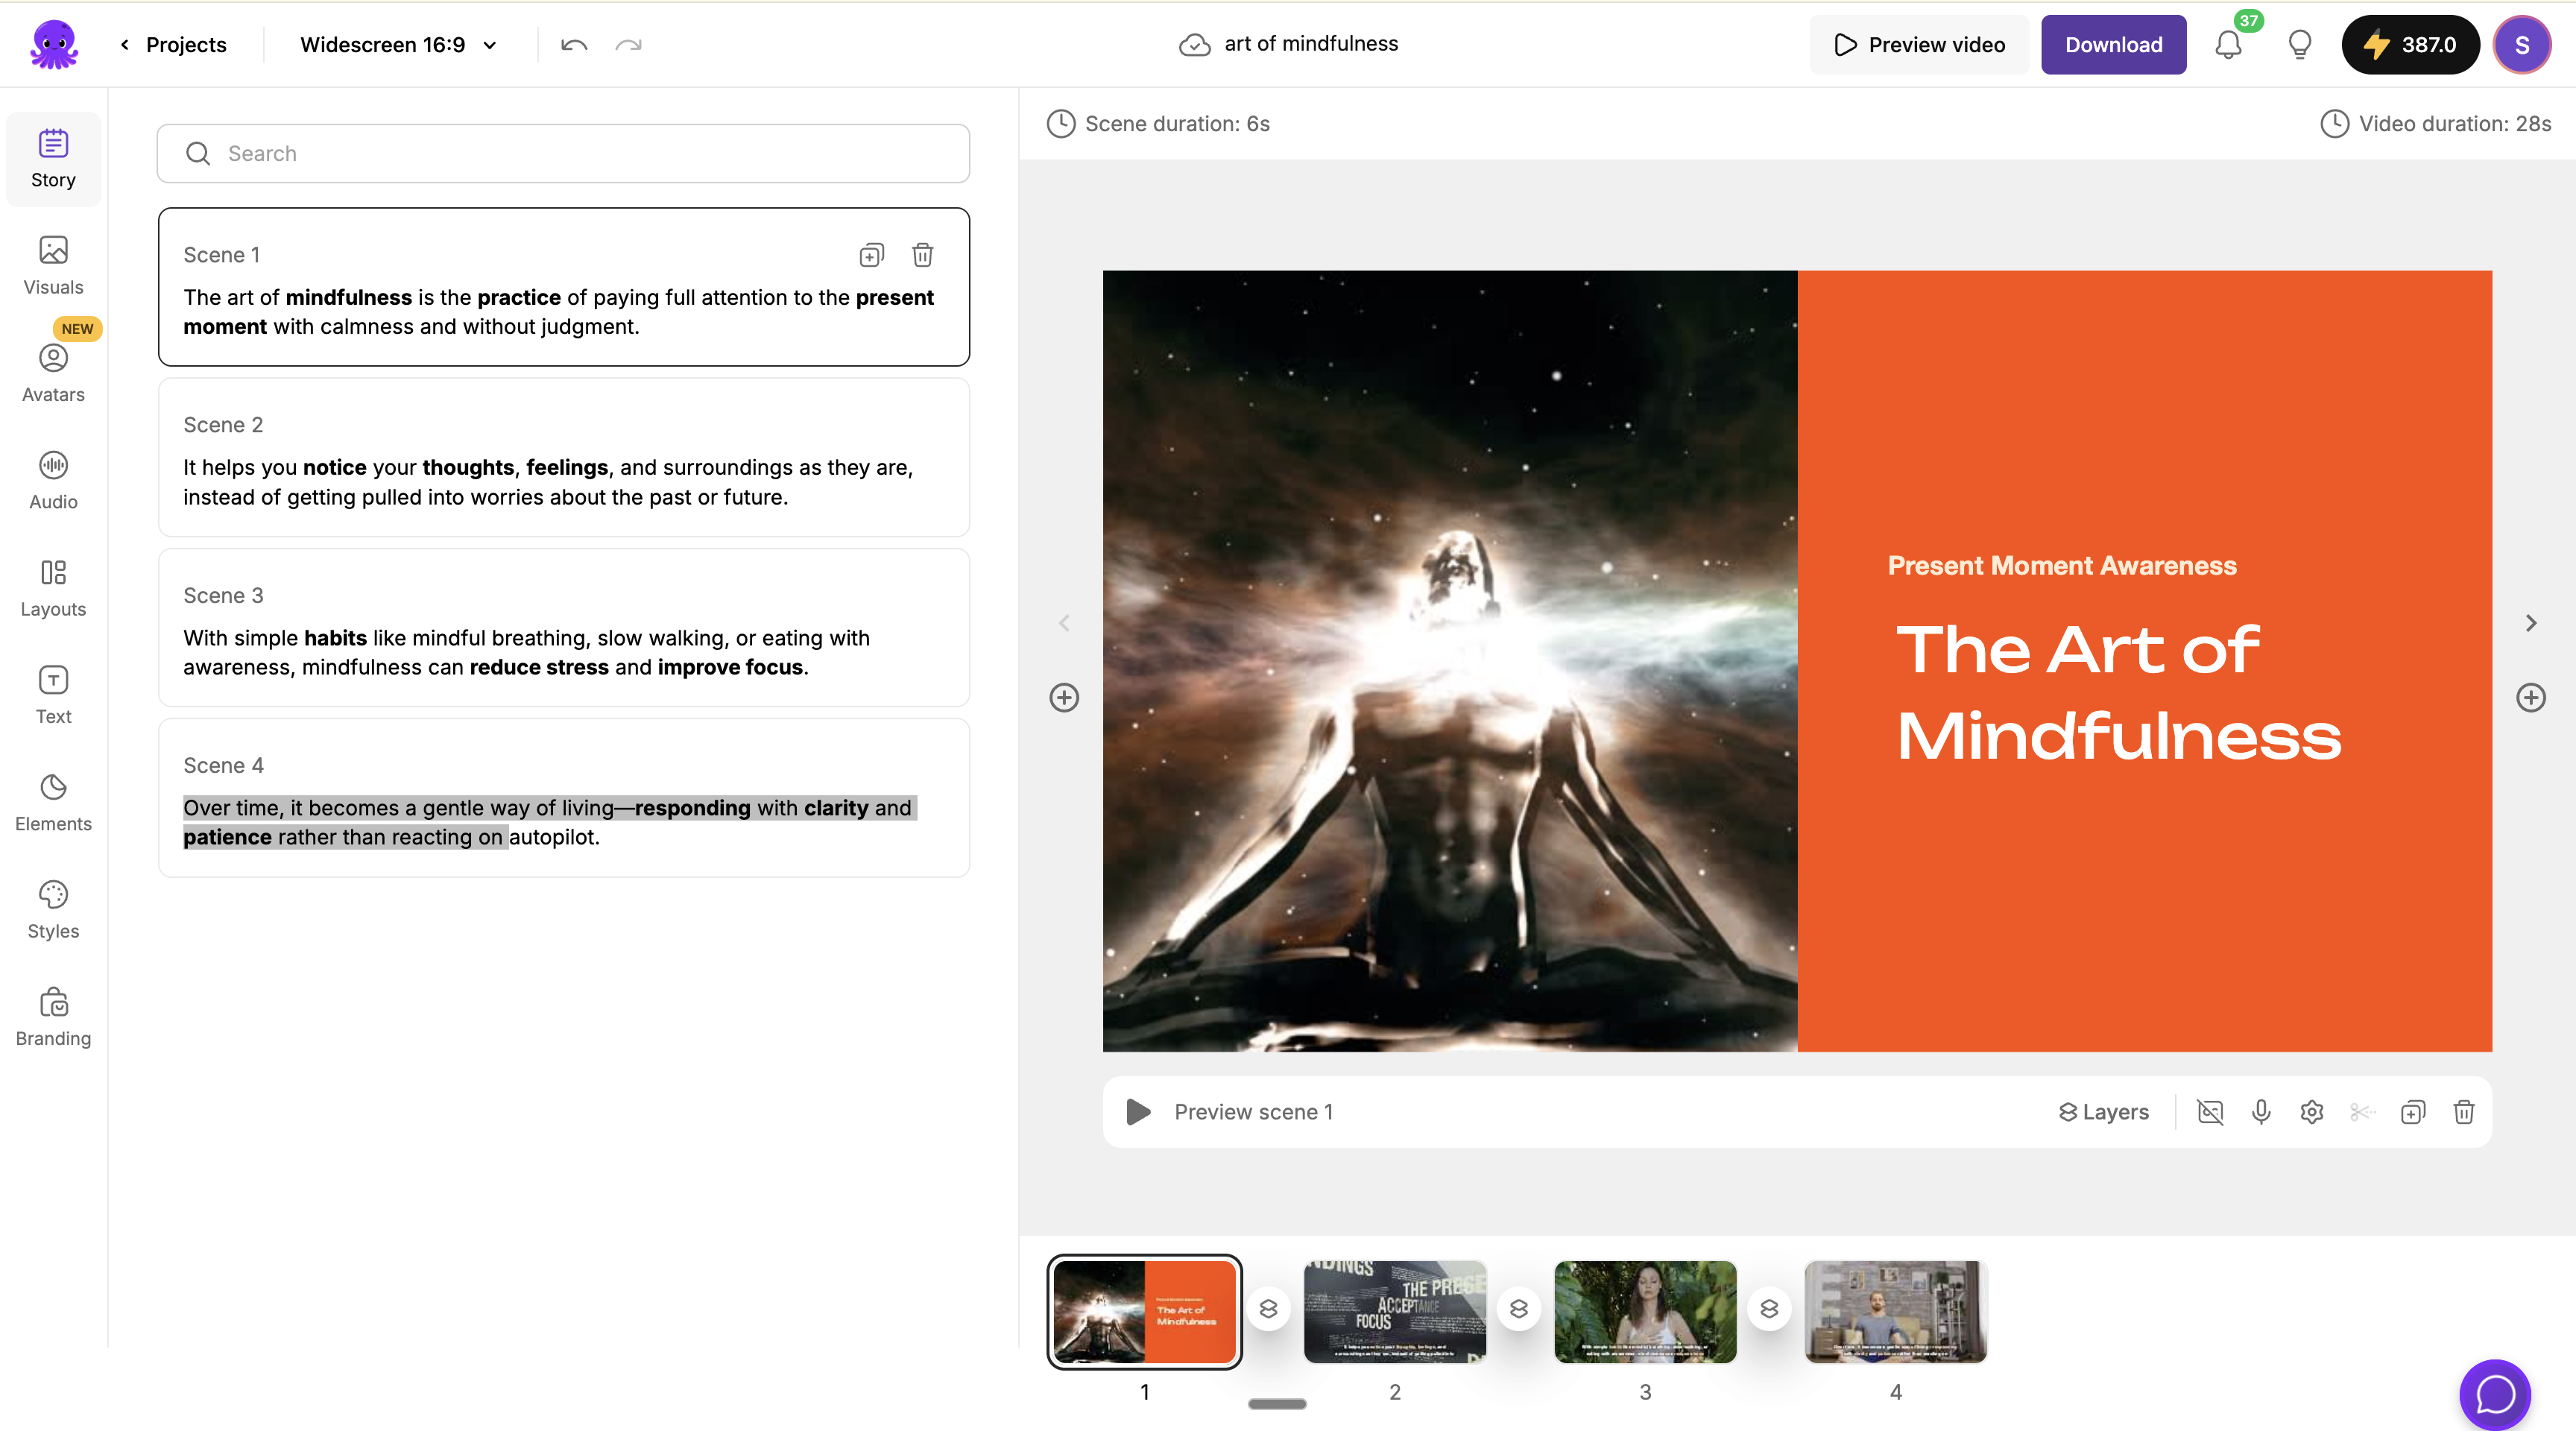 The example project "art of mindfulness" contains 4 scenes with:
* Background videos and images
* Header text layers ("Present Moment Awareness", "The Art of Mindfulness")
* Subtitles that will be narrated as voice-over
* Custom layouts and styling
**Design Tips for Templates:**
* Use consistent layouts across scenes for professional results
* Add placeholder text using `{{variables}}` for dynamic personalization
* Test your design with different content lengths to ensure proper fitting
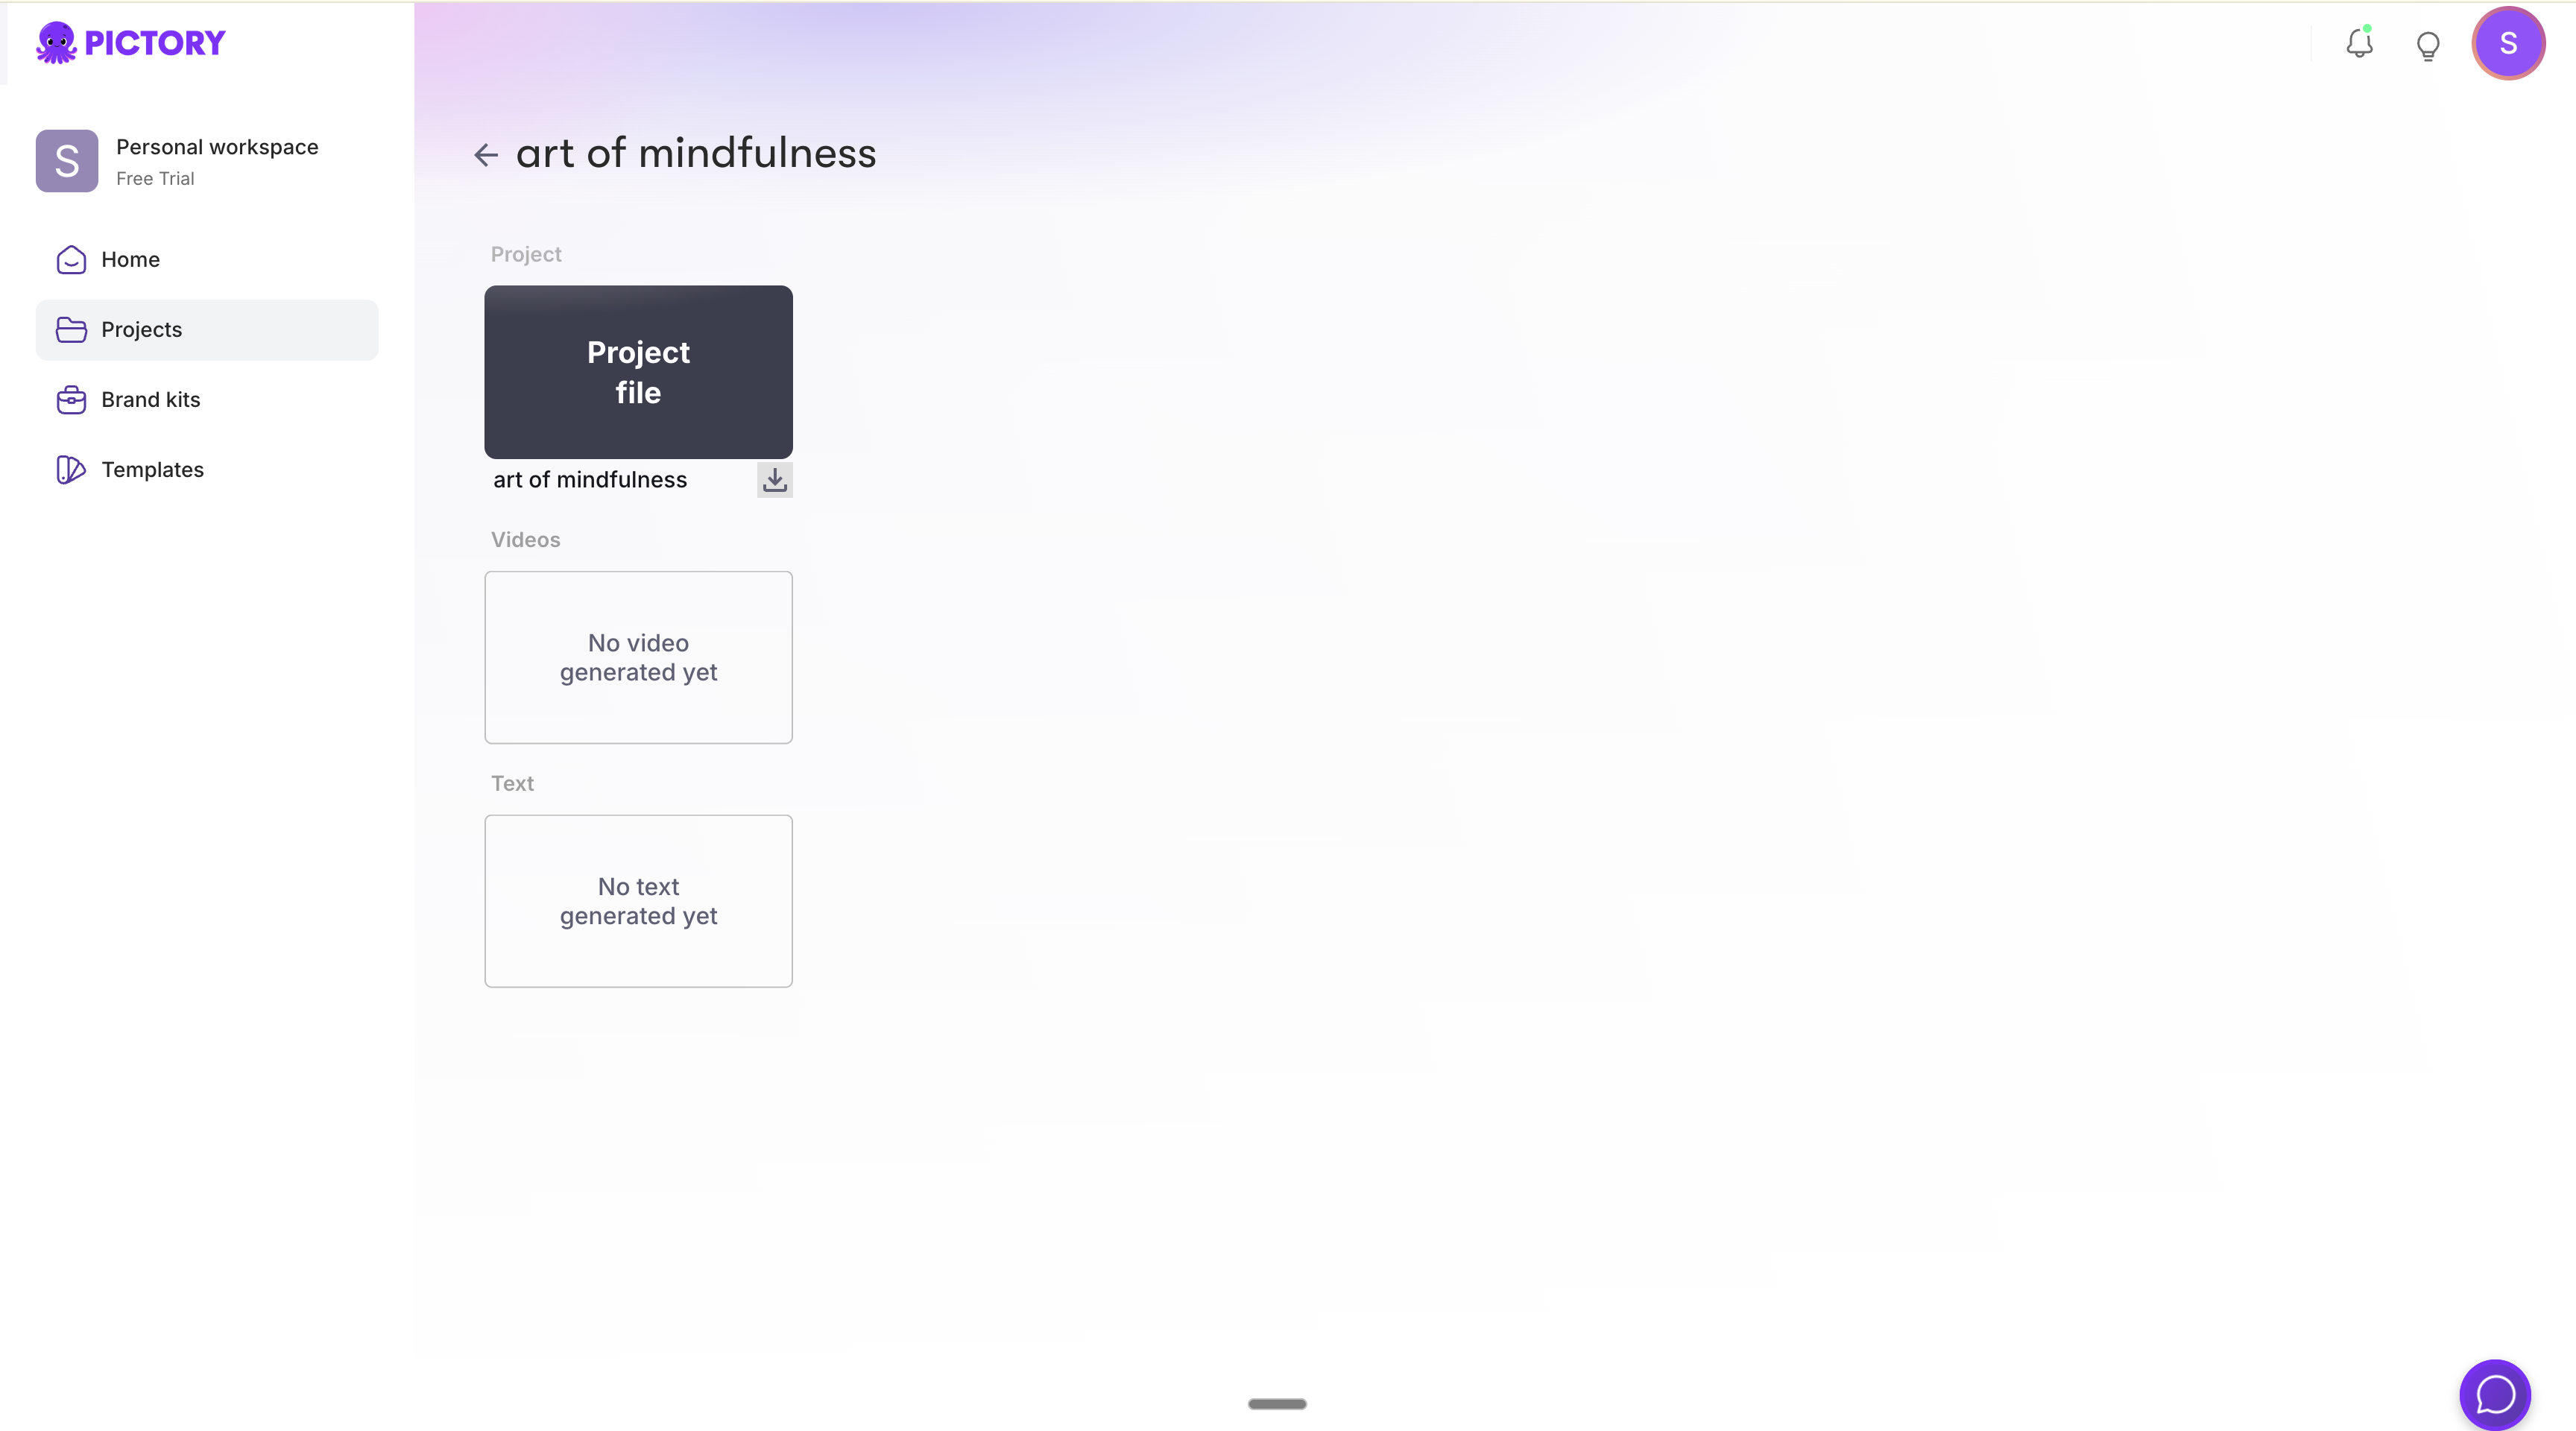
### Step 2: Download the Project File
Once your project is ready, download it as a `.pictai` file:
1. Go to your [Projects Page](https://app.pictory.ai/myvideos)
2. Find your project and click on it to open details
3. Click the download icon next to the project file
4. Save the `.pictai` file to your computer
The example project "art of mindfulness" contains 4 scenes with:
* Background videos and images
* Header text layers ("Present Moment Awareness", "The Art of Mindfulness")
* Subtitles that will be narrated as voice-over
* Custom layouts and styling
**Design Tips for Templates:**
* Use consistent layouts across scenes for professional results
* Add placeholder text using `{{variables}}` for dynamic personalization
* Test your design with different content lengths to ensure proper fitting
### Step 2: Download the Project File
Once your project is ready, download it as a `.pictai` file:
1. Go to your [Projects Page](https://app.pictory.ai/myvideos)
2. Find your project and click on it to open details
3. Click the download icon next to the project file
4. Save the `.pictai` file to your computer
 The `.pictai` file contains your complete project configuration including scenes, layers, audio settings, and visual assets.
### Step 3: Create a Template from the Project
Upload your `.pictai` file to the Template API to create a reusable template:
```http theme={null}
POST https://api.pictory.ai/pictoryapis/v1/templates
Content-Type: application/octet-stream
Authorization: YOUR_API_KEY
```
```javascript Node.js theme={null}
import axios from "axios";
import fs from "fs";
const API_BASE_URL = "https://api.pictory.ai/pictoryapis";
const API_KEY = "YOUR_API_KEY";
async function createTemplateFromProject(filePath) {
console.log("Creating template from project file...");
const fileBuffer = fs.readFileSync(filePath);
const response = await axios.post(
`${API_BASE_URL}/v1/templates`,
fileBuffer,
{
headers: {
"Content-Type": "application/octet-stream",
Authorization: API_KEY,
},
}
);
const template = response.data;
console.log("Template created successfully!");
console.log("Template ID:", template.templateId);
console.log("Template Name:", template.name);
console.log("Scenes:", template.scenes.length);
return template;
}
// Upload your .pictai file
createTemplateFromProject("art of mindfulness.pictai")
.then(template => console.log("\nTemplate ready for use!"))
.catch(error => console.error("Error:", error.message));
```
```python Python theme={null}
import requests
API_BASE_URL = 'https://api.pictory.ai/pictoryapis'
API_KEY = 'YOUR_API_KEY'
def create_template_from_project(file_path):
print("Creating template from project file...")
with open(file_path, 'rb') as file:
response = requests.post(
f'{API_BASE_URL}/v1/templates',
data=file,
headers={
'Content-Type': 'application/octet-stream',
'Authorization': API_KEY
}
)
response.raise_for_status()
template = response.json()
print("Template created successfully!")
print(f"Template ID: {template['templateId']}")
print(f"Template Name: {template['name']}")
print(f"Scenes: {len(template['scenes'])}")
return template
# Upload your .pictai file
template = create_template_from_project('art of mindfulness.pictai')
print("\nTemplate ready for use!")
```
```bash cURL theme={null}
curl --location 'https://api.pictory.ai/pictoryapis/v1/templates' \
--header 'Authorization: YOUR_API_KEY' \
--header 'Content-Type: application/octet-stream' \
--data-binary '@art of mindfulness.pictai'
```
### Step 4: Get Template Details
Retrieve your template details to see the structure, scene IDs, layer IDs, and available customization points:
```http theme={null}
GET https://api.pictory.ai/pictoryapis/v1/templates/{templateId}
Authorization: YOUR_API_KEY
```
```javascript Node.js theme={null}
async function getTemplateDetails(templateId) {
const response = await axios.get(
`${API_BASE_URL}/v1/templates/${templateId}`,
{
headers: { Authorization: API_KEY },
}
);
const template = response.data;
console.log("Template Details:");
console.log("Name:", template.name);
console.log("Language:", template.language);
console.log("\nScenes:");
template.scenes.forEach((scene, index) => {
console.log(`\n Scene ${index + 1} (ID: ${scene.sceneId})`);
// Show subtitles
scene.subtitles?.forEach(sub => {
console.log(` Subtitle: "${sub.text.substring(0, 50)}..."`);
});
// Show layers
scene.layers?.flat().forEach(layer => {
console.log(` Layer (${layer.type}): ${layer.layerId}`);
if (layer.text) console.log(` Text: "${layer.text}"`);
});
});
return template;
}
getTemplateDetails("20260109004915031f181efb6b65749d7b5eae230cdc9c5df");
```
```python Python theme={null}
def get_template_details(template_id):
response = requests.get(
f'{API_BASE_URL}/v1/templates/{template_id}',
headers={'Authorization': API_KEY}
)
response.raise_for_status()
template = response.json()
print("Template Details:")
print(f"Name: {template['name']}")
print(f"Language: {template['language']}")
print("\nScenes:")
for index, scene in enumerate(template['scenes']):
print(f"\n Scene {index + 1} (ID: {scene['sceneId']})")
# Show subtitles
for sub in scene.get('subtitles', []):
print(f" Subtitle: \"{sub['text'][:50]}...\"")
# Show layers
for layer_group in scene.get('layers', []):
for layer in layer_group:
print(f" Layer ({layer['type']}): {layer['layerId']}")
if layer.get('text'):
print(f" Text: \"{layer['text']}\"")
return template
get_template_details('20260109004915031f181efb6b65749d7b5eae230cdc9c5df')
```
**Example Template Response:**
```json theme={null}
{
"templateId": "20260109004915031f181efb6b65749d7b5eae230cdc9c5df",
"name": "art of mindfulness",
"language": "en",
"published": true,
"backgroundMusic": {
"enabled": true,
"musicUrl": "https://tracks.melod.ie/track_versions/...",
"volume": 1
},
"scenes": [
{
"sceneId": "20260109004556808c640d883dc9a4bfe983cba4eadb7a0f1",
"subtitles": [
{
"text": "The art of mindfulness is the practice of paying full attention to the present moment with calmness and without judgment."
}
],
"layers": [
[
{
"layerId": "20260109004557054ef9462b6ae5f4d81afdafeb85ed369f1",
"type": "video",
"url": "https://media.gettyimages.com/..."
},
{
"layerId": "202601090045570540d50b1852611498aa9f51b69131648ad",
"type": "text",
"text": "Present Moment Awareness"
},
{
"layerId": "2026010900455705400270d33493b471d9b7e722bd804f06a",
"type": "text",
"text": "The Art of Mindfulness"
}
]
]
},
{
"sceneId": "20260109004556808ff7ed6167ea1471e8bc034c4844bb56d",
"subtitles": [
{
"text": "It helps you notice your thoughts, feelings, and surroundings..."
}
]
}
]
}
```
## Using Template Variables
Template variables provide a simple way to personalize videos without modifying the underlying structure. Variables defined in your project using `{{variableName}}` syntax are automatically detected and can be replaced when rendering videos.
### How Template Variables Work
When you create a template from a project that contains `{{variableName}}` placeholders, these become customizable variables. The template response includes a `variables` object showing all detected placeholders.
### Variable Syntax
| Syntax | Description |
| ----------------- | ------------------------------------- |
| `{{Name}}` | Simple variable for personalization |
| `{{CompanyName}}` | Variable for company-specific content |
| `{{ProductName}}` | Variable for product names |
| `{{Date}}` | Variable for dynamic dates |
Variables can be placed in:
* Scene subtitles/narration text
* Text layers (headers, titles, captions)
* Any text element in your project
### Example: Template with Variables
If your template contains text like:
```
Scene 1: "Welcome {{Name}} to {{CompanyName}}!"
Scene 2: "Your personalized journey starts on {{Date}}."
```
The template response will include:
```json theme={null}
{
"templateId": "your_template_id",
"name": "Welcome Template",
"variables": {
"Name": "NAME",
"CompanyName": "COMPANY_NAME",
"Date": "DATE"
}
}
```
### Render Video with Variable Substitution
Use the `variables` object to replace placeholders with actual values:
```javascript Node.js theme={null}
const response = await axios.post(
`${API_BASE_URL}/v2/video/storyboard/render`,
{
templateId: "your_template_id",
videoName: "welcome_john_acme",
variables: {
Name: "John Smith",
CompanyName: "Acme Corporation",
Date: "January 15, 2026"
}
},
{
headers: {
"Content-Type": "application/json",
Authorization: API_KEY,
},
}
);
console.log("Job ID:", response.data.data.jobId);
```
```python Python theme={null}
response = requests.post(
f'{API_BASE_URL}/v2/video/storyboard/render',
json={
'templateId': 'your_template_id',
'videoName': 'welcome_john_acme',
'variables': {
'Name': 'John Smith',
'CompanyName': 'Acme Corporation',
'Date': 'January 15, 2026'
}
},
headers={
'Content-Type': 'application/json',
'Authorization': API_KEY
}
)
print(f"Job ID: {response.json()['data']['jobId']}")
```
This transforms:
* `{{Name}}` → `John Smith`
* `{{CompanyName}}` → `Acme Corporation`
* `{{Date}}` → `January 15, 2026`
### Generating Personalized Videos at Scale
The real power of template variables is generating personalized videos for many recipients:
```javascript Node.js theme={null}
const recipients = [
{ name: "John Smith", company: "Acme Corp", date: "January 15" },
{ name: "Sarah Wilson", company: "Tech Inc", date: "January 16" },
{ name: "Michael Brown", company: "Global Ltd", date: "January 17" },
];
async function createPersonalizedVideos() {
const jobs = [];
for (const recipient of recipients) {
console.log(`Creating video for ${recipient.name}...`);
const response = await axios.post(
`${API_BASE_URL}/v2/video/storyboard/render`,
{
templateId: TEMPLATE_ID,
videoName: `welcome_${recipient.name.toLowerCase().replace(" ", "_")}`,
variables: {
Name: recipient.name,
CompanyName: recipient.company,
Date: recipient.date
}
},
{ headers: { "Content-Type": "application/json", Authorization: API_KEY } }
);
jobs.push({
recipient: recipient.name,
jobId: response.data.data.jobId
});
console.log(`Started job: ${response.data.data.jobId}`);
}
return jobs;
}
createPersonalizedVideos();
```
```python Python theme={null}
recipients = [
{'name': 'John Smith', 'company': 'Acme Corp', 'date': 'January 15'},
{'name': 'Sarah Wilson', 'company': 'Tech Inc', 'date': 'January 16'},
{'name': 'Michael Brown', 'company': 'Global Ltd', 'date': 'January 17'},
]
def create_personalized_videos():
jobs = []
for recipient in recipients:
print(f"Creating video for {recipient['name']}...")
response = requests.post(
f'{API_BASE_URL}/v2/video/storyboard/render',
json={
'templateId': TEMPLATE_ID,
'videoName': f"welcome_{recipient['name'].lower().replace(' ', '_')}",
'variables': {
'Name': recipient['name'],
'CompanyName': recipient['company'],
'Date': recipient['date']
}
},
headers={'Content-Type': 'application/json', 'Authorization': API_KEY}
)
response.raise_for_status()
job_id = response.json()['data']['jobId']
jobs.append({'recipient': recipient['name'], 'jobId': job_id})
print(f"Started job: {job_id}")
return jobs
create_personalized_videos()
```
### Common Variable Use Cases
**Personalized Greetings:**
```json theme={null}
{
"templateId": "greeting_template_id",
"videoName": "birthday_greeting",
"variables": {
"RecipientName": "John",
"Occasion": "Birthday",
"SenderName": "The Marketing Team"
}
}
```
**Product Promotions:**
```json theme={null}
{
"templateId": "promo_template_id",
"videoName": "winter_sale",
"variables": {
"ProductName": "Winter Collection",
"Discount": "25%",
"PromoCode": "WINTER25"
}
}
```
**Customer Onboarding:**
```json theme={null}
{
"templateId": "onboarding_template_id",
"videoName": "onboarding_acme",
"variables": {
"CompanyName": "Acme Corp",
"AccountManager": "Mike Wilson",
"TrialDays": "14"
}
}
```
**Variable Naming Tips:**
* Use descriptive names like `{{CustomerName}}` instead of `{{n}}`
* Variables are case-sensitive: `{{Name}}` and `{{name}}` are different
* Avoid spaces in variable names: use `{{FirstName}}` not `{{First Name}}`
### Combining Variables with Template Overrides
You can use both `variables` for simple text substitution and `templateOverride` for structural changes in the same request:
```json theme={null}
{
"templateId": "your_template_id",
"videoName": "combined_example",
"variables": {
"Name": "John Smith",
"CompanyName": "Acme Corp"
},
"scenes": [
{
"templateOverride": {
"scenePosition": 1,
"layers": [
[
{
"layerId": "header_layer_id",
"type": "image",
"url": "https://your-cdn.com/acme-logo.png"
}
]
]
}
}
]
}
```
This approach allows you to:
* Replace text variables globally with the `variables` object
* Override specific layers (like logos or background videos) with `templateOverride`
* Add, delete, or modify scenes while maintaining personalization
## Using Template Overrides
The `templateOverride` object allows you to customize existing scenes, add new scenes, or modify layers when creating videos from your template.
### Understanding Template Override Structure
```json theme={null}
{
"templateId": "your_template_id",
"scenes": [
{
"templateOverride": {
// Reference existing scene by ID or position
"sceneId": "existing_scene_id", // OR
"scenePosition": 1, // 1-based position
// Modify existing scene content
"subtitles": [...], // Override subtitles
"layers": [...], // Override layers
// Scene operations
"deleteScene": true, // Delete this scene
"copyScene": true // Duplicate this scene
}
}
]
}
```
### Override Existing Scene Subtitles
Replace the subtitle text of an existing scene:
```javascript Node.js theme={null}
const response = await axios.post(
`${API_BASE_URL}/v2/video/storyboard/render`,
{
templateId: "20260109004915031f181efb6b65749d7b5eae230cdc9c5df",
videoName: "mindfulness_customized",
scenes: [
{
templateOverride: {
sceneId: "20260109004556808c640d883dc9a4bfe983cba4eadb7a0f1",
subtitles: [
{
text: "Welcome to the journey of self-awareness and inner peace through mindfulness meditation."
}
]
}
}
]
},
{ headers: { Authorization: API_KEY, "Content-Type": "application/json" } }
);
```
```python Python theme={null}
response = requests.post(
f'{API_BASE_URL}/v2/video/storyboard/render',
json={
'templateId': '20260109004915031f181efb6b65749d7b5eae230cdc9c5df',
'videoName': 'mindfulness_customized',
'scenes': [
{
'templateOverride': {
'sceneId': '20260109004556808c640d883dc9a4bfe983cba4eadb7a0f1',
'subtitles': [
{
'text': 'Welcome to the journey of self-awareness and inner peace through mindfulness meditation.'
}
]
}
}
]
},
headers={'Authorization': API_KEY, 'Content-Type': 'application/json'}
)
```
### Override Scene Layers
Replace text, images, or videos in scene layers:
```json theme={null}
{
"templateId": "your_template_id",
"scenes": [
{
"templateOverride": {
"sceneId": "20260109004556808c640d883dc9a4bfe983cba4eadb7a0f1",
"layers": [
[
{
"layerId": "20260109004557054ef9462b6ae5f4d81afdafeb85ed369f1",
"type": "video",
"url": "https://your-cdn.com/new-background-video.mp4"
},
{
"layerId": "202601090045570540d50b1852611498aa9f51b69131648ad",
"type": "text",
"text": "New Header Text"
},
{
"layerId": "2026010900455705400270d33493b471d9b7e722bd804f06a",
"type": "text",
"text": "Updated Title"
}
]
]
}
}
]
}
```
### Layer Override Options
| Property | Type | Description |
| ------------- | ------- | ----------------------------------------------- |
| `layerId` | string | ID of the layer to modify |
| `type` | string | Layer type: `text`, `image`, or `video` |
| `text` | string | New text content (for text layers) |
| `url` | string | New media URL (for image/video layers) |
| `style` | object | Override text styling (font, color, size, etc.) |
| `styleId` | string | Apply a predefined text style |
| `styleName` | string | Apply a text style by name |
| `deleteLayer` | boolean | Remove this layer from the scene |
### Override with Custom Text Styles
```json theme={null}
{
"templateOverride": {
"sceneId": "your_scene_id",
"layers": [
[
{
"layerId": "your_layer_id",
"type": "text",
"text": "Styled Header",
"style": {
"fontFamily": "Montserrat",
"fontSize": 48,
"color": "#FF5722",
"position": "top-center",
"alignment": "center",
"decorations": ["bold"]
}
}
]
]
}
}
```
### Delete or Copy Scenes
**Delete a scene:**
```json theme={null}
{
"templateOverride": {
"sceneId": "scene_to_delete",
"deleteScene": true
}
}
```
**Duplicate a scene:**
```json theme={null}
{
"templateOverride": {
"scenePosition": 2,
"copyScene": true
}
}
```
## Adding New Scenes to Templates
You can insert new scenes into your template at specific positions. New scenes require content from one of these sources: `story`, `storyCoPilot`, `blogUrl`, `pptUrl`, `audioUrl`, or `videoUrl`.
### Scene Positioning Options
| Property | Description |
| ---------------------- | ------------------------------------- |
| `newScenePosition` | Insert at specific position (1-based) |
| `insertAfterSceneId` | Insert after a specific scene ID |
| `insertBeforeSceneId` | Insert before a specific scene ID |
| `replaceSceneId` | Replace an existing scene by ID |
| `replaceScenePosition` | Replace scene at position (1-based) |
### Inherit Style from Existing Scene
When adding new scenes, you can inherit the layout and styling from an existing scene:
| Property | Description |
| ------------------- | ---------------------------------------- |
| `baseSceneId` | Use this scene's style as the base |
| `baseScenePosition` | Use scene at this position as style base |
### Example: Insert a New Scene After Scene 1
```json theme={null}
{
"templateId": "20260109004915031f181efb6b65749d7b5eae230cdc9c5df",
"videoName": "mindfulness_with_new_scene",
"scenes": [
{
"templateOverride": {
"insertAfterSceneId": "20260109004556808c640d883dc9a4bfe983cba4eadb7a0f1",
"baseSceneId": "20260109004556808c640d883dc9a4bfe983cba4eadb7a0f1"
},
"story": "Mindfulness helps us connect with our inner self and find peace in everyday moments."
}
]
}
```
### Example: Replace Scene 3 with New Content
```javascript Node.js theme={null}
const response = await axios.post(
`${API_BASE_URL}/v2/video/storyboard/render`,
{
templateId: "20260109004915031f181efb6b65749d7b5eae230cdc9c5df",
videoName: "mindfulness_replaced_scene",
scenes: [
{
templateOverride: {
replaceScenePosition: 3,
baseScenePosition: 1 // Use Scene 1's style
},
story: "Practice deep breathing: inhale for 4 counts, hold for 4, exhale for 4. This simple technique calms your nervous system instantly."
}
]
},
{ headers: { Authorization: API_KEY, "Content-Type": "application/json" } }
);
```
```python Python theme={null}
response = requests.post(
f'{API_BASE_URL}/v2/video/storyboard/render',
json={
'templateId': '20260109004915031f181efb6b65749d7b5eae230cdc9c5df',
'videoName': 'mindfulness_replaced_scene',
'scenes': [
{
'templateOverride': {
'replaceScenePosition': 3,
'baseScenePosition': 1
},
'story': 'Practice deep breathing: inhale for 4 counts, hold for 4, exhale for 4. This simple technique calms your nervous system instantly.'
}
]
},
headers={'Authorization': API_KEY, 'Content-Type': 'application/json'}
)
```
### Example: Add Scene at Specific Position
```json theme={null}
{
"templateId": "your_template_id",
"scenes": [
{
"templateOverride": {
"newScenePosition": 2,
"baseSceneId": "existing_scene_id"
},
"story": "This new scene will appear at position 2, pushing existing scenes down."
}
]
}
```
### New Scene Content Sources
When adding new scenes, provide content using one of these properties:
| Property | Description |
| -------------- | --------------------------------------------- |
| `story` | Plain text content for the scene narration |
| `storyCoPilot` | AI-generated content based on a prompt |
| `blogUrl` | URL to a blog article to extract content from |
| `pptUrl` | URL to a PowerPoint presentation |
| `audioUrl` | URL to an audio file for transcription |
| `videoUrl` | URL to a video file for repurposing |
**Example with Story CoPilot:**
```json theme={null}
{
"templateOverride": {
"insertAfterSceneId": "scene_123",
"baseSceneId": "scene_123"
},
"storyCoPilot": {
"videoType": "Explainer",
"prompt": "Explain the benefits of morning meditation for productivity",
"tone": "friendly",
"duration": 30
}
}
```
**Example with Blog URL:**
```json theme={null}
{
"templateOverride": {
"newScenePosition": 3,
"baseScenePosition": 1
},
"blogUrl": "https://example.com/article-about-mindfulness"
}
```
## Complete Example: Dynamic Video Generation
Here's a complete example that demonstrates overriding existing content and adding new scenes:
```javascript Node.js theme={null}
import axios from "axios";
const API_BASE_URL = "https://api.pictory.ai/pictoryapis";
const API_KEY = "YOUR_API_KEY";
const TEMPLATE_ID = "20260109004915031f181efb6b65749d7b5eae230cdc9c5df";
async function createCustomizedVideo() {
console.log("Creating customized video from template...");
const response = await axios.post(
`${API_BASE_URL}/v2/video/storyboard/render`,
{
templateId: TEMPLATE_ID,
videoName: "mindfulness_personalized",
// Override voice settings
voiceOver: {
enabled: true,
aiVoices: [{ speaker: "Brian", speed: 100 }]
},
scenes: [
// Override Scene 1: Update subtitles and text layers
{
templateOverride: {
scenePosition: 1,
subtitles: [
{
text: "Welcome to your personal mindfulness journey. Let's explore the art of being present."
}
],
layers: [
[
{
layerId: "202601090045570540d50b1852611498aa9f51b69131648ad",
type: "text",
text: "Your Journey Begins"
},
{
layerId: "2026010900455705400270d33493b471d9b7e722bd804f06a",
type: "text",
text: "Mindfulness for Beginners"
}
]
]
}
},
// Add new scene after Scene 1 using AI-generated content
{
templateOverride: {
insertAfterSceneId: "20260109004556808c640d883dc9a4bfe983cba4eadb7a0f1",
baseSceneId: "20260109004556808c640d883dc9a4bfe983cba4eadb7a0f1"
},
storyCoPilot: {
videoType: "Explainer",
prompt: "Describe a simple 1-minute breathing exercise for stress relief",
tone: "calm",
duration: 15
}
},
// Override Scene 2: Change subtitle text
{
templateOverride: {
scenePosition: 2,
subtitles: [
{
text: "Notice your breath. Feel the air flowing in and out. This simple act anchors you to the present."
}
]
}
},
// Replace Scene 4 with new story content
{
templateOverride: {
replaceScenePosition: 4,
baseScenePosition: 1
},
story: "As you continue this practice daily, you'll discover a deeper sense of calm and clarity in everything you do."
}
]
},
{
headers: {
"Content-Type": "application/json",
Authorization: API_KEY,
},
}
);
const jobId = response.data.data.jobId;
console.log("Video creation started!");
console.log("Job ID:", jobId);
return jobId;
}
async function waitForVideo(jobId) {
console.log("\nMonitoring video creation...");
while (true) {
const response = await axios.get(
`${API_BASE_URL}/v1/jobs/${jobId}`,
{ headers: { Authorization: API_KEY } }
);
const status = response.data.data.status;
console.log("Status:", status);
if (status === "completed") {
console.log("\nVideo is ready!");
console.log("Video URL:", response.data.data.videoURL);
return response.data;
} else if (status === "failed") {
throw new Error("Video creation failed");
}
await new Promise(resolve => setTimeout(resolve, 5000));
}
}
// Run the workflow
createCustomizedVideo()
.then(jobId => waitForVideo(jobId))
.catch(error => console.error("Error:", error));
```
```python Python theme={null}
import requests
import time
API_BASE_URL = 'https://api.pictory.ai/pictoryapis'
API_KEY = 'YOUR_API_KEY'
TEMPLATE_ID = '20260109004915031f181efb6b65749d7b5eae230cdc9c5df'
def create_customized_video():
print("Creating customized video from template...")
response = requests.post(
f'{API_BASE_URL}/v2/video/storyboard/render',
json={
'templateId': TEMPLATE_ID,
'videoName': 'mindfulness_personalized',
# Override voice settings
'voiceOver': {
'enabled': True,
'aiVoices': [{'speaker': 'Brian', 'speed': 100}]
},
'scenes': [
# Override Scene 1
{
'templateOverride': {
'scenePosition': 1,
'subtitles': [
{'text': 'Welcome to your personal mindfulness journey. Let\'s explore the art of being present.'}
],
'layers': [
[
{
'layerId': '202601090045570540d50b1852611498aa9f51b69131648ad',
'type': 'text',
'text': 'Your Journey Begins'
},
{
'layerId': '2026010900455705400270d33493b471d9b7e722bd804f06a',
'type': 'text',
'text': 'Mindfulness for Beginners'
}
]
]
}
},
# Add new scene after Scene 1
{
'templateOverride': {
'insertAfterSceneId': '20260109004556808c640d883dc9a4bfe983cba4eadb7a0f1',
'baseSceneId': '20260109004556808c640d883dc9a4bfe983cba4eadb7a0f1'
},
'storyCoPilot': {
'videoType': 'Explainer',
'prompt': 'Describe a simple 1-minute breathing exercise for stress relief',
'tone': 'calm',
'duration': 15
}
},
# Override Scene 2
{
'templateOverride': {
'scenePosition': 2,
'subtitles': [
{'text': 'Notice your breath. Feel the air flowing in and out. This simple act anchors you to the present.'}
]
}
},
# Replace Scene 4
{
'templateOverride': {
'replaceScenePosition': 4,
'baseScenePosition': 1
},
'story': 'As you continue this practice daily, you\'ll discover a deeper sense of calm and clarity in everything you do.'
}
]
},
headers={'Content-Type': 'application/json', 'Authorization': API_KEY}
)
response.raise_for_status()
job_id = response.json()['data']['jobId']
print("Video creation started!")
print(f"Job ID: {job_id}")
return job_id
def wait_for_video(job_id):
print("\nMonitoring video creation...")
while True:
response = requests.get(
f'{API_BASE_URL}/v1/jobs/{job_id}',
headers={'Authorization': API_KEY}
)
response.raise_for_status()
status = response.json()['data']['status']
print(f"Status: {status}")
if status == 'completed':
print("\nVideo is ready!")
print(f"Video URL: {response.json()['data']['videoURL']}")
return response.json()
elif status == 'failed':
raise Exception("Video creation failed")
time.sleep(5)
# Run the workflow
if __name__ == '__main__':
job_id = create_customized_video()
wait_for_video(job_id)
```
## Template Override Reference
### Referencing Existing Scenes
| Property | Type | Description |
| --------------- | ------ | ------------------------------------- |
| `sceneId` | string | Reference scene by unique ID |
| `scenePosition` | number | Reference scene by position (1-based) |
Use either `sceneId` or `scenePosition`, not both. Scene IDs are more reliable as positions can change.
### Adding New Scenes
| Property | Type | Description |
| ---------------------- | ------ | --------------------------------- |
| `newScenePosition` | number | Insert at this position (1-based) |
| `insertAfterSceneId` | string | Insert after this scene |
| `insertBeforeSceneId` | string | Insert before this scene |
| `replaceSceneId` | string | Replace this scene entirely |
| `replaceScenePosition` | number | Replace scene at this position |
### Styling New Scenes
| Property | Type | Description |
| ------------------- | ------ | ------------------------------------ |
| `baseSceneId` | string | Inherit style from this scene |
| `baseScenePosition` | number | Inherit style from scene at position |
### Scene Operations
| Property | Type | Description |
| ------------- | ------- | ----------------------------- |
| `deleteScene` | boolean | Remove this scene from output |
| `copyScene` | boolean | Duplicate this scene |
## Best Practices
* Create modular scenes that work independently
* Use consistent layer naming for easy identification
* Design with various content lengths in mind
* Test templates with different override combinations
* Scene IDs are stable identifiers that do not change
* Positions shift when scenes are added or removed
* Store and reference scene IDs from the Get Template response
* Use positions only when the template structure is fixed
* Fetch template details to verify scene and layer IDs exist
* Check that media URLs are accessible before submission
* Test with small changes before complex overrides
* Monitor job status and handle failures gracefully
* Use optimized image and video formats
* Host media on reliable CDNs with good latency
* Match video dimensions to template aspect ratio
* Keep file sizes reasonable for faster processing
## Troubleshooting
**Problem:** API returns error about invalid scene or layer ID.
**Solution:**
* Fetch fresh template details using Get Template API
* Verify the ID matches exactly (case-sensitive)
* Check that the scene/layer has not been removed
* Use `scenePosition` if scene IDs have changed
**Problem:** Added scene does not show in rendered video.
**Solution:**
* Ensure you have provided a content source (story, blogUrl, etc.)
* Verify positioning parameters are correct
* Check that `baseSceneId` or `baseScenePosition` exists
* Review job status for any processing errors
**Problem:** Text or media changes not reflected in output.
**Solution:**
* Confirm the `layerId` matches template exactly
* Ensure `type` matches the layer type in template
* Check that media URLs are publicly accessible
* Verify the layer is not being deleted elsewhere
**Problem:** New scene does not match expected styling.
**Solution:**
* Verify `baseSceneId` or `baseScenePosition` is valid
* Check that the base scene has the styling you expect
* Only one of baseSceneId or baseScenePosition should be used
* Ensure the base scene is not being deleted in the same request
## Next Steps
Explore more advanced features to enhance your template-based workflows:
Use variables for simple personalization at scale
Add AI narration to your template videos
Apply consistent layouts across scenes
Maintain brand consistency in generated videos
## API Reference
Upload .pictai files to create templates
Retrieve template structure and IDs
Create videos with template overrides
Monitor video creation progress
The `.pictai` file contains your complete project configuration including scenes, layers, audio settings, and visual assets.
### Step 3: Create a Template from the Project
Upload your `.pictai` file to the Template API to create a reusable template:
```http theme={null}
POST https://api.pictory.ai/pictoryapis/v1/templates
Content-Type: application/octet-stream
Authorization: YOUR_API_KEY
```
```javascript Node.js theme={null}
import axios from "axios";
import fs from "fs";
const API_BASE_URL = "https://api.pictory.ai/pictoryapis";
const API_KEY = "YOUR_API_KEY";
async function createTemplateFromProject(filePath) {
console.log("Creating template from project file...");
const fileBuffer = fs.readFileSync(filePath);
const response = await axios.post(
`${API_BASE_URL}/v1/templates`,
fileBuffer,
{
headers: {
"Content-Type": "application/octet-stream",
Authorization: API_KEY,
},
}
);
const template = response.data;
console.log("Template created successfully!");
console.log("Template ID:", template.templateId);
console.log("Template Name:", template.name);
console.log("Scenes:", template.scenes.length);
return template;
}
// Upload your .pictai file
createTemplateFromProject("art of mindfulness.pictai")
.then(template => console.log("\nTemplate ready for use!"))
.catch(error => console.error("Error:", error.message));
```
```python Python theme={null}
import requests
API_BASE_URL = 'https://api.pictory.ai/pictoryapis'
API_KEY = 'YOUR_API_KEY'
def create_template_from_project(file_path):
print("Creating template from project file...")
with open(file_path, 'rb') as file:
response = requests.post(
f'{API_BASE_URL}/v1/templates',
data=file,
headers={
'Content-Type': 'application/octet-stream',
'Authorization': API_KEY
}
)
response.raise_for_status()
template = response.json()
print("Template created successfully!")
print(f"Template ID: {template['templateId']}")
print(f"Template Name: {template['name']}")
print(f"Scenes: {len(template['scenes'])}")
return template
# Upload your .pictai file
template = create_template_from_project('art of mindfulness.pictai')
print("\nTemplate ready for use!")
```
```bash cURL theme={null}
curl --location 'https://api.pictory.ai/pictoryapis/v1/templates' \
--header 'Authorization: YOUR_API_KEY' \
--header 'Content-Type: application/octet-stream' \
--data-binary '@art of mindfulness.pictai'
```
### Step 4: Get Template Details
Retrieve your template details to see the structure, scene IDs, layer IDs, and available customization points:
```http theme={null}
GET https://api.pictory.ai/pictoryapis/v1/templates/{templateId}
Authorization: YOUR_API_KEY
```
```javascript Node.js theme={null}
async function getTemplateDetails(templateId) {
const response = await axios.get(
`${API_BASE_URL}/v1/templates/${templateId}`,
{
headers: { Authorization: API_KEY },
}
);
const template = response.data;
console.log("Template Details:");
console.log("Name:", template.name);
console.log("Language:", template.language);
console.log("\nScenes:");
template.scenes.forEach((scene, index) => {
console.log(`\n Scene ${index + 1} (ID: ${scene.sceneId})`);
// Show subtitles
scene.subtitles?.forEach(sub => {
console.log(` Subtitle: "${sub.text.substring(0, 50)}..."`);
});
// Show layers
scene.layers?.flat().forEach(layer => {
console.log(` Layer (${layer.type}): ${layer.layerId}`);
if (layer.text) console.log(` Text: "${layer.text}"`);
});
});
return template;
}
getTemplateDetails("20260109004915031f181efb6b65749d7b5eae230cdc9c5df");
```
```python Python theme={null}
def get_template_details(template_id):
response = requests.get(
f'{API_BASE_URL}/v1/templates/{template_id}',
headers={'Authorization': API_KEY}
)
response.raise_for_status()
template = response.json()
print("Template Details:")
print(f"Name: {template['name']}")
print(f"Language: {template['language']}")
print("\nScenes:")
for index, scene in enumerate(template['scenes']):
print(f"\n Scene {index + 1} (ID: {scene['sceneId']})")
# Show subtitles
for sub in scene.get('subtitles', []):
print(f" Subtitle: \"{sub['text'][:50]}...\"")
# Show layers
for layer_group in scene.get('layers', []):
for layer in layer_group:
print(f" Layer ({layer['type']}): {layer['layerId']}")
if layer.get('text'):
print(f" Text: \"{layer['text']}\"")
return template
get_template_details('20260109004915031f181efb6b65749d7b5eae230cdc9c5df')
```
**Example Template Response:**
```json theme={null}
{
"templateId": "20260109004915031f181efb6b65749d7b5eae230cdc9c5df",
"name": "art of mindfulness",
"language": "en",
"published": true,
"backgroundMusic": {
"enabled": true,
"musicUrl": "https://tracks.melod.ie/track_versions/...",
"volume": 1
},
"scenes": [
{
"sceneId": "20260109004556808c640d883dc9a4bfe983cba4eadb7a0f1",
"subtitles": [
{
"text": "The art of mindfulness is the practice of paying full attention to the present moment with calmness and without judgment."
}
],
"layers": [
[
{
"layerId": "20260109004557054ef9462b6ae5f4d81afdafeb85ed369f1",
"type": "video",
"url": "https://media.gettyimages.com/..."
},
{
"layerId": "202601090045570540d50b1852611498aa9f51b69131648ad",
"type": "text",
"text": "Present Moment Awareness"
},
{
"layerId": "2026010900455705400270d33493b471d9b7e722bd804f06a",
"type": "text",
"text": "The Art of Mindfulness"
}
]
]
},
{
"sceneId": "20260109004556808ff7ed6167ea1471e8bc034c4844bb56d",
"subtitles": [
{
"text": "It helps you notice your thoughts, feelings, and surroundings..."
}
]
}
]
}
```
## Using Template Variables
Template variables provide a simple way to personalize videos without modifying the underlying structure. Variables defined in your project using `{{variableName}}` syntax are automatically detected and can be replaced when rendering videos.
### How Template Variables Work
When you create a template from a project that contains `{{variableName}}` placeholders, these become customizable variables. The template response includes a `variables` object showing all detected placeholders.
### Variable Syntax
| Syntax | Description |
| ----------------- | ------------------------------------- |
| `{{Name}}` | Simple variable for personalization |
| `{{CompanyName}}` | Variable for company-specific content |
| `{{ProductName}}` | Variable for product names |
| `{{Date}}` | Variable for dynamic dates |
Variables can be placed in:
* Scene subtitles/narration text
* Text layers (headers, titles, captions)
* Any text element in your project
### Example: Template with Variables
If your template contains text like:
```
Scene 1: "Welcome {{Name}} to {{CompanyName}}!"
Scene 2: "Your personalized journey starts on {{Date}}."
```
The template response will include:
```json theme={null}
{
"templateId": "your_template_id",
"name": "Welcome Template",
"variables": {
"Name": "NAME",
"CompanyName": "COMPANY_NAME",
"Date": "DATE"
}
}
```
### Render Video with Variable Substitution
Use the `variables` object to replace placeholders with actual values:
```javascript Node.js theme={null}
const response = await axios.post(
`${API_BASE_URL}/v2/video/storyboard/render`,
{
templateId: "your_template_id",
videoName: "welcome_john_acme",
variables: {
Name: "John Smith",
CompanyName: "Acme Corporation",
Date: "January 15, 2026"
}
},
{
headers: {
"Content-Type": "application/json",
Authorization: API_KEY,
},
}
);
console.log("Job ID:", response.data.data.jobId);
```
```python Python theme={null}
response = requests.post(
f'{API_BASE_URL}/v2/video/storyboard/render',
json={
'templateId': 'your_template_id',
'videoName': 'welcome_john_acme',
'variables': {
'Name': 'John Smith',
'CompanyName': 'Acme Corporation',
'Date': 'January 15, 2026'
}
},
headers={
'Content-Type': 'application/json',
'Authorization': API_KEY
}
)
print(f"Job ID: {response.json()['data']['jobId']}")
```
This transforms:
* `{{Name}}` → `John Smith`
* `{{CompanyName}}` → `Acme Corporation`
* `{{Date}}` → `January 15, 2026`
### Generating Personalized Videos at Scale
The real power of template variables is generating personalized videos for many recipients:
```javascript Node.js theme={null}
const recipients = [
{ name: "John Smith", company: "Acme Corp", date: "January 15" },
{ name: "Sarah Wilson", company: "Tech Inc", date: "January 16" },
{ name: "Michael Brown", company: "Global Ltd", date: "January 17" },
];
async function createPersonalizedVideos() {
const jobs = [];
for (const recipient of recipients) {
console.log(`Creating video for ${recipient.name}...`);
const response = await axios.post(
`${API_BASE_URL}/v2/video/storyboard/render`,
{
templateId: TEMPLATE_ID,
videoName: `welcome_${recipient.name.toLowerCase().replace(" ", "_")}`,
variables: {
Name: recipient.name,
CompanyName: recipient.company,
Date: recipient.date
}
},
{ headers: { "Content-Type": "application/json", Authorization: API_KEY } }
);
jobs.push({
recipient: recipient.name,
jobId: response.data.data.jobId
});
console.log(`Started job: ${response.data.data.jobId}`);
}
return jobs;
}
createPersonalizedVideos();
```
```python Python theme={null}
recipients = [
{'name': 'John Smith', 'company': 'Acme Corp', 'date': 'January 15'},
{'name': 'Sarah Wilson', 'company': 'Tech Inc', 'date': 'January 16'},
{'name': 'Michael Brown', 'company': 'Global Ltd', 'date': 'January 17'},
]
def create_personalized_videos():
jobs = []
for recipient in recipients:
print(f"Creating video for {recipient['name']}...")
response = requests.post(
f'{API_BASE_URL}/v2/video/storyboard/render',
json={
'templateId': TEMPLATE_ID,
'videoName': f"welcome_{recipient['name'].lower().replace(' ', '_')}",
'variables': {
'Name': recipient['name'],
'CompanyName': recipient['company'],
'Date': recipient['date']
}
},
headers={'Content-Type': 'application/json', 'Authorization': API_KEY}
)
response.raise_for_status()
job_id = response.json()['data']['jobId']
jobs.append({'recipient': recipient['name'], 'jobId': job_id})
print(f"Started job: {job_id}")
return jobs
create_personalized_videos()
```
### Common Variable Use Cases
**Personalized Greetings:**
```json theme={null}
{
"templateId": "greeting_template_id",
"videoName": "birthday_greeting",
"variables": {
"RecipientName": "John",
"Occasion": "Birthday",
"SenderName": "The Marketing Team"
}
}
```
**Product Promotions:**
```json theme={null}
{
"templateId": "promo_template_id",
"videoName": "winter_sale",
"variables": {
"ProductName": "Winter Collection",
"Discount": "25%",
"PromoCode": "WINTER25"
}
}
```
**Customer Onboarding:**
```json theme={null}
{
"templateId": "onboarding_template_id",
"videoName": "onboarding_acme",
"variables": {
"CompanyName": "Acme Corp",
"AccountManager": "Mike Wilson",
"TrialDays": "14"
}
}
```
**Variable Naming Tips:**
* Use descriptive names like `{{CustomerName}}` instead of `{{n}}`
* Variables are case-sensitive: `{{Name}}` and `{{name}}` are different
* Avoid spaces in variable names: use `{{FirstName}}` not `{{First Name}}`
### Combining Variables with Template Overrides
You can use both `variables` for simple text substitution and `templateOverride` for structural changes in the same request:
```json theme={null}
{
"templateId": "your_template_id",
"videoName": "combined_example",
"variables": {
"Name": "John Smith",
"CompanyName": "Acme Corp"
},
"scenes": [
{
"templateOverride": {
"scenePosition": 1,
"layers": [
[
{
"layerId": "header_layer_id",
"type": "image",
"url": "https://your-cdn.com/acme-logo.png"
}
]
]
}
}
]
}
```
This approach allows you to:
* Replace text variables globally with the `variables` object
* Override specific layers (like logos or background videos) with `templateOverride`
* Add, delete, or modify scenes while maintaining personalization
## Using Template Overrides
The `templateOverride` object allows you to customize existing scenes, add new scenes, or modify layers when creating videos from your template.
### Understanding Template Override Structure
```json theme={null}
{
"templateId": "your_template_id",
"scenes": [
{
"templateOverride": {
// Reference existing scene by ID or position
"sceneId": "existing_scene_id", // OR
"scenePosition": 1, // 1-based position
// Modify existing scene content
"subtitles": [...], // Override subtitles
"layers": [...], // Override layers
// Scene operations
"deleteScene": true, // Delete this scene
"copyScene": true // Duplicate this scene
}
}
]
}
```
### Override Existing Scene Subtitles
Replace the subtitle text of an existing scene:
```javascript Node.js theme={null}
const response = await axios.post(
`${API_BASE_URL}/v2/video/storyboard/render`,
{
templateId: "20260109004915031f181efb6b65749d7b5eae230cdc9c5df",
videoName: "mindfulness_customized",
scenes: [
{
templateOverride: {
sceneId: "20260109004556808c640d883dc9a4bfe983cba4eadb7a0f1",
subtitles: [
{
text: "Welcome to the journey of self-awareness and inner peace through mindfulness meditation."
}
]
}
}
]
},
{ headers: { Authorization: API_KEY, "Content-Type": "application/json" } }
);
```
```python Python theme={null}
response = requests.post(
f'{API_BASE_URL}/v2/video/storyboard/render',
json={
'templateId': '20260109004915031f181efb6b65749d7b5eae230cdc9c5df',
'videoName': 'mindfulness_customized',
'scenes': [
{
'templateOverride': {
'sceneId': '20260109004556808c640d883dc9a4bfe983cba4eadb7a0f1',
'subtitles': [
{
'text': 'Welcome to the journey of self-awareness and inner peace through mindfulness meditation.'
}
]
}
}
]
},
headers={'Authorization': API_KEY, 'Content-Type': 'application/json'}
)
```
### Override Scene Layers
Replace text, images, or videos in scene layers:
```json theme={null}
{
"templateId": "your_template_id",
"scenes": [
{
"templateOverride": {
"sceneId": "20260109004556808c640d883dc9a4bfe983cba4eadb7a0f1",
"layers": [
[
{
"layerId": "20260109004557054ef9462b6ae5f4d81afdafeb85ed369f1",
"type": "video",
"url": "https://your-cdn.com/new-background-video.mp4"
},
{
"layerId": "202601090045570540d50b1852611498aa9f51b69131648ad",
"type": "text",
"text": "New Header Text"
},
{
"layerId": "2026010900455705400270d33493b471d9b7e722bd804f06a",
"type": "text",
"text": "Updated Title"
}
]
]
}
}
]
}
```
### Layer Override Options
| Property | Type | Description |
| ------------- | ------- | ----------------------------------------------- |
| `layerId` | string | ID of the layer to modify |
| `type` | string | Layer type: `text`, `image`, or `video` |
| `text` | string | New text content (for text layers) |
| `url` | string | New media URL (for image/video layers) |
| `style` | object | Override text styling (font, color, size, etc.) |
| `styleId` | string | Apply a predefined text style |
| `styleName` | string | Apply a text style by name |
| `deleteLayer` | boolean | Remove this layer from the scene |
### Override with Custom Text Styles
```json theme={null}
{
"templateOverride": {
"sceneId": "your_scene_id",
"layers": [
[
{
"layerId": "your_layer_id",
"type": "text",
"text": "Styled Header",
"style": {
"fontFamily": "Montserrat",
"fontSize": 48,
"color": "#FF5722",
"position": "top-center",
"alignment": "center",
"decorations": ["bold"]
}
}
]
]
}
}
```
### Delete or Copy Scenes
**Delete a scene:**
```json theme={null}
{
"templateOverride": {
"sceneId": "scene_to_delete",
"deleteScene": true
}
}
```
**Duplicate a scene:**
```json theme={null}
{
"templateOverride": {
"scenePosition": 2,
"copyScene": true
}
}
```
## Adding New Scenes to Templates
You can insert new scenes into your template at specific positions. New scenes require content from one of these sources: `story`, `storyCoPilot`, `blogUrl`, `pptUrl`, `audioUrl`, or `videoUrl`.
### Scene Positioning Options
| Property | Description |
| ---------------------- | ------------------------------------- |
| `newScenePosition` | Insert at specific position (1-based) |
| `insertAfterSceneId` | Insert after a specific scene ID |
| `insertBeforeSceneId` | Insert before a specific scene ID |
| `replaceSceneId` | Replace an existing scene by ID |
| `replaceScenePosition` | Replace scene at position (1-based) |
### Inherit Style from Existing Scene
When adding new scenes, you can inherit the layout and styling from an existing scene:
| Property | Description |
| ------------------- | ---------------------------------------- |
| `baseSceneId` | Use this scene's style as the base |
| `baseScenePosition` | Use scene at this position as style base |
### Example: Insert a New Scene After Scene 1
```json theme={null}
{
"templateId": "20260109004915031f181efb6b65749d7b5eae230cdc9c5df",
"videoName": "mindfulness_with_new_scene",
"scenes": [
{
"templateOverride": {
"insertAfterSceneId": "20260109004556808c640d883dc9a4bfe983cba4eadb7a0f1",
"baseSceneId": "20260109004556808c640d883dc9a4bfe983cba4eadb7a0f1"
},
"story": "Mindfulness helps us connect with our inner self and find peace in everyday moments."
}
]
}
```
### Example: Replace Scene 3 with New Content
```javascript Node.js theme={null}
const response = await axios.post(
`${API_BASE_URL}/v2/video/storyboard/render`,
{
templateId: "20260109004915031f181efb6b65749d7b5eae230cdc9c5df",
videoName: "mindfulness_replaced_scene",
scenes: [
{
templateOverride: {
replaceScenePosition: 3,
baseScenePosition: 1 // Use Scene 1's style
},
story: "Practice deep breathing: inhale for 4 counts, hold for 4, exhale for 4. This simple technique calms your nervous system instantly."
}
]
},
{ headers: { Authorization: API_KEY, "Content-Type": "application/json" } }
);
```
```python Python theme={null}
response = requests.post(
f'{API_BASE_URL}/v2/video/storyboard/render',
json={
'templateId': '20260109004915031f181efb6b65749d7b5eae230cdc9c5df',
'videoName': 'mindfulness_replaced_scene',
'scenes': [
{
'templateOverride': {
'replaceScenePosition': 3,
'baseScenePosition': 1
},
'story': 'Practice deep breathing: inhale for 4 counts, hold for 4, exhale for 4. This simple technique calms your nervous system instantly.'
}
]
},
headers={'Authorization': API_KEY, 'Content-Type': 'application/json'}
)
```
### Example: Add Scene at Specific Position
```json theme={null}
{
"templateId": "your_template_id",
"scenes": [
{
"templateOverride": {
"newScenePosition": 2,
"baseSceneId": "existing_scene_id"
},
"story": "This new scene will appear at position 2, pushing existing scenes down."
}
]
}
```
### New Scene Content Sources
When adding new scenes, provide content using one of these properties:
| Property | Description |
| -------------- | --------------------------------------------- |
| `story` | Plain text content for the scene narration |
| `storyCoPilot` | AI-generated content based on a prompt |
| `blogUrl` | URL to a blog article to extract content from |
| `pptUrl` | URL to a PowerPoint presentation |
| `audioUrl` | URL to an audio file for transcription |
| `videoUrl` | URL to a video file for repurposing |
**Example with Story CoPilot:**
```json theme={null}
{
"templateOverride": {
"insertAfterSceneId": "scene_123",
"baseSceneId": "scene_123"
},
"storyCoPilot": {
"videoType": "Explainer",
"prompt": "Explain the benefits of morning meditation for productivity",
"tone": "friendly",
"duration": 30
}
}
```
**Example with Blog URL:**
```json theme={null}
{
"templateOverride": {
"newScenePosition": 3,
"baseScenePosition": 1
},
"blogUrl": "https://example.com/article-about-mindfulness"
}
```
## Complete Example: Dynamic Video Generation
Here's a complete example that demonstrates overriding existing content and adding new scenes:
```javascript Node.js theme={null}
import axios from "axios";
const API_BASE_URL = "https://api.pictory.ai/pictoryapis";
const API_KEY = "YOUR_API_KEY";
const TEMPLATE_ID = "20260109004915031f181efb6b65749d7b5eae230cdc9c5df";
async function createCustomizedVideo() {
console.log("Creating customized video from template...");
const response = await axios.post(
`${API_BASE_URL}/v2/video/storyboard/render`,
{
templateId: TEMPLATE_ID,
videoName: "mindfulness_personalized",
// Override voice settings
voiceOver: {
enabled: true,
aiVoices: [{ speaker: "Brian", speed: 100 }]
},
scenes: [
// Override Scene 1: Update subtitles and text layers
{
templateOverride: {
scenePosition: 1,
subtitles: [
{
text: "Welcome to your personal mindfulness journey. Let's explore the art of being present."
}
],
layers: [
[
{
layerId: "202601090045570540d50b1852611498aa9f51b69131648ad",
type: "text",
text: "Your Journey Begins"
},
{
layerId: "2026010900455705400270d33493b471d9b7e722bd804f06a",
type: "text",
text: "Mindfulness for Beginners"
}
]
]
}
},
// Add new scene after Scene 1 using AI-generated content
{
templateOverride: {
insertAfterSceneId: "20260109004556808c640d883dc9a4bfe983cba4eadb7a0f1",
baseSceneId: "20260109004556808c640d883dc9a4bfe983cba4eadb7a0f1"
},
storyCoPilot: {
videoType: "Explainer",
prompt: "Describe a simple 1-minute breathing exercise for stress relief",
tone: "calm",
duration: 15
}
},
// Override Scene 2: Change subtitle text
{
templateOverride: {
scenePosition: 2,
subtitles: [
{
text: "Notice your breath. Feel the air flowing in and out. This simple act anchors you to the present."
}
]
}
},
// Replace Scene 4 with new story content
{
templateOverride: {
replaceScenePosition: 4,
baseScenePosition: 1
},
story: "As you continue this practice daily, you'll discover a deeper sense of calm and clarity in everything you do."
}
]
},
{
headers: {
"Content-Type": "application/json",
Authorization: API_KEY,
},
}
);
const jobId = response.data.data.jobId;
console.log("Video creation started!");
console.log("Job ID:", jobId);
return jobId;
}
async function waitForVideo(jobId) {
console.log("\nMonitoring video creation...");
while (true) {
const response = await axios.get(
`${API_BASE_URL}/v1/jobs/${jobId}`,
{ headers: { Authorization: API_KEY } }
);
const status = response.data.data.status;
console.log("Status:", status);
if (status === "completed") {
console.log("\nVideo is ready!");
console.log("Video URL:", response.data.data.videoURL);
return response.data;
} else if (status === "failed") {
throw new Error("Video creation failed");
}
await new Promise(resolve => setTimeout(resolve, 5000));
}
}
// Run the workflow
createCustomizedVideo()
.then(jobId => waitForVideo(jobId))
.catch(error => console.error("Error:", error));
```
```python Python theme={null}
import requests
import time
API_BASE_URL = 'https://api.pictory.ai/pictoryapis'
API_KEY = 'YOUR_API_KEY'
TEMPLATE_ID = '20260109004915031f181efb6b65749d7b5eae230cdc9c5df'
def create_customized_video():
print("Creating customized video from template...")
response = requests.post(
f'{API_BASE_URL}/v2/video/storyboard/render',
json={
'templateId': TEMPLATE_ID,
'videoName': 'mindfulness_personalized',
# Override voice settings
'voiceOver': {
'enabled': True,
'aiVoices': [{'speaker': 'Brian', 'speed': 100}]
},
'scenes': [
# Override Scene 1
{
'templateOverride': {
'scenePosition': 1,
'subtitles': [
{'text': 'Welcome to your personal mindfulness journey. Let\'s explore the art of being present.'}
],
'layers': [
[
{
'layerId': '202601090045570540d50b1852611498aa9f51b69131648ad',
'type': 'text',
'text': 'Your Journey Begins'
},
{
'layerId': '2026010900455705400270d33493b471d9b7e722bd804f06a',
'type': 'text',
'text': 'Mindfulness for Beginners'
}
]
]
}
},
# Add new scene after Scene 1
{
'templateOverride': {
'insertAfterSceneId': '20260109004556808c640d883dc9a4bfe983cba4eadb7a0f1',
'baseSceneId': '20260109004556808c640d883dc9a4bfe983cba4eadb7a0f1'
},
'storyCoPilot': {
'videoType': 'Explainer',
'prompt': 'Describe a simple 1-minute breathing exercise for stress relief',
'tone': 'calm',
'duration': 15
}
},
# Override Scene 2
{
'templateOverride': {
'scenePosition': 2,
'subtitles': [
{'text': 'Notice your breath. Feel the air flowing in and out. This simple act anchors you to the present.'}
]
}
},
# Replace Scene 4
{
'templateOverride': {
'replaceScenePosition': 4,
'baseScenePosition': 1
},
'story': 'As you continue this practice daily, you\'ll discover a deeper sense of calm and clarity in everything you do.'
}
]
},
headers={'Content-Type': 'application/json', 'Authorization': API_KEY}
)
response.raise_for_status()
job_id = response.json()['data']['jobId']
print("Video creation started!")
print(f"Job ID: {job_id}")
return job_id
def wait_for_video(job_id):
print("\nMonitoring video creation...")
while True:
response = requests.get(
f'{API_BASE_URL}/v1/jobs/{job_id}',
headers={'Authorization': API_KEY}
)
response.raise_for_status()
status = response.json()['data']['status']
print(f"Status: {status}")
if status == 'completed':
print("\nVideo is ready!")
print(f"Video URL: {response.json()['data']['videoURL']}")
return response.json()
elif status == 'failed':
raise Exception("Video creation failed")
time.sleep(5)
# Run the workflow
if __name__ == '__main__':
job_id = create_customized_video()
wait_for_video(job_id)
```
## Template Override Reference
### Referencing Existing Scenes
| Property | Type | Description |
| --------------- | ------ | ------------------------------------- |
| `sceneId` | string | Reference scene by unique ID |
| `scenePosition` | number | Reference scene by position (1-based) |
Use either `sceneId` or `scenePosition`, not both. Scene IDs are more reliable as positions can change.
### Adding New Scenes
| Property | Type | Description |
| ---------------------- | ------ | --------------------------------- |
| `newScenePosition` | number | Insert at this position (1-based) |
| `insertAfterSceneId` | string | Insert after this scene |
| `insertBeforeSceneId` | string | Insert before this scene |
| `replaceSceneId` | string | Replace this scene entirely |
| `replaceScenePosition` | number | Replace scene at this position |
### Styling New Scenes
| Property | Type | Description |
| ------------------- | ------ | ------------------------------------ |
| `baseSceneId` | string | Inherit style from this scene |
| `baseScenePosition` | number | Inherit style from scene at position |
### Scene Operations
| Property | Type | Description |
| ------------- | ------- | ----------------------------- |
| `deleteScene` | boolean | Remove this scene from output |
| `copyScene` | boolean | Duplicate this scene |
## Best Practices
* Create modular scenes that work independently
* Use consistent layer naming for easy identification
* Design with various content lengths in mind
* Test templates with different override combinations
* Scene IDs are stable identifiers that do not change
* Positions shift when scenes are added or removed
* Store and reference scene IDs from the Get Template response
* Use positions only when the template structure is fixed
* Fetch template details to verify scene and layer IDs exist
* Check that media URLs are accessible before submission
* Test with small changes before complex overrides
* Monitor job status and handle failures gracefully
* Use optimized image and video formats
* Host media on reliable CDNs with good latency
* Match video dimensions to template aspect ratio
* Keep file sizes reasonable for faster processing
## Troubleshooting
**Problem:** API returns error about invalid scene or layer ID.
**Solution:**
* Fetch fresh template details using Get Template API
* Verify the ID matches exactly (case-sensitive)
* Check that the scene/layer has not been removed
* Use `scenePosition` if scene IDs have changed
**Problem:** Added scene does not show in rendered video.
**Solution:**
* Ensure you have provided a content source (story, blogUrl, etc.)
* Verify positioning parameters are correct
* Check that `baseSceneId` or `baseScenePosition` exists
* Review job status for any processing errors
**Problem:** Text or media changes not reflected in output.
**Solution:**
* Confirm the `layerId` matches template exactly
* Ensure `type` matches the layer type in template
* Check that media URLs are publicly accessible
* Verify the layer is not being deleted elsewhere
**Problem:** New scene does not match expected styling.
**Solution:**
* Verify `baseSceneId` or `baseScenePosition` is valid
* Check that the base scene has the styling you expect
* Only one of baseSceneId or baseScenePosition should be used
* Ensure the base scene is not being deleted in the same request
## Next Steps
Explore more advanced features to enhance your template-based workflows:
Use variables for simple personalization at scale
Add AI narration to your template videos
Apply consistent layouts across scenes
Maintain brand consistency in generated videos
## API Reference
Upload .pictai files to create templates
Retrieve template structure and IDs
Create videos with template overrides
Monitor video creation progress